Quick Answer
The most common reason a laptop gets stuck on the BIOS screen is that it cannot find a bootable drive. This usually happens because of a wrong boot order, a failing SSD, a loose storage connection, or corrupted boot files. Fixing the boot order in BIOS settings resolves the problem in most cases within five minutes.
Introduction
You press the power button, the laptop starts, and instead of loading Windows, it drops you straight into a blue or gray BIOS utility screen. It does not matter how many times you restart. The laptop just keeps landing in the same place.
This happens when your laptop cannot locate a valid bootable operating system. The firmware runs its startup checks, cannot hand off to Windows, and dumps you into the BIOS interface as a fallback. It is not always a disaster, but the cause matters a lot before you start pressing random keys.
This guide walks through every confirmed cause, a fast diagnosis method, and the exact steps to fix it, from a five-second boot order change to more serious SSD and motherboard-level problems.
Symptoms of the Problem

- Laptop powers on but boots straight into the BIOS/UEFI setup screen every time
- Screen displays “Enter Setup,” “BIOS Utility,” or “Setup Utility” without prompting
- Windows logo never appears
- Laptop cycles between BIOS and restart loop without completing boot
- BIOS shows no storage device listed under “Boot” or “Boot Devices”
- After a BIOS update, the laptop will not boot normally
- BIOS clock and date reset to default on every startup (CMOS battery symptom)
- SSD or HDD is missing from the BIOS device list entirely
- Laptop shows BIOS screen only after RAM or SSD replacement
Start Here: Fast Diagnosis
Work through this tree before attempting any fix. It saves time and prevents unnecessary steps.
Step 1: Does BIOS detect your storage drive?
Go into BIOS, check the Storage or Boot section. If the SSD or HDD appears, move to Step 2. If nothing appears, jump to the SSD/HDD diagnosis section.
Step 2: Is Windows listed as a boot option?
Inside BIOS Boot settings, check if Windows Boot Manager appears. If it does but is not the first option, fix the boot order. If it does not appear at all, move to Step 3.
Step 3: Did this start after a hardware change?
If you just swapped RAM, SSD, or a battery, that hardware is the likely cause. Reseat the new component first before anything else.
Step 4: Does the BIOS clock reset every time?
If the date and time revert to factory defaults on each boot, your CMOS battery is dead. This alone can prevent normal boot on some models.
Step 5: Did this start after a BIOS update?
A failed BIOS flash causes exactly this symptom. You need BIOS recovery mode, not a standard fix.
Tools Needed
Built-in tools:
- BIOS/UEFI setup (accessed at startup via F2, F10, Del, or Esc depending on brand)
- Windows Recovery Environment (via bootable USB)
- Startup Repair (built into Windows installer USB)
Software tools:
- Windows 10/11 Media Creation Tool (to create bootable USB)
- Rufus (for creating bootable USB from ISO)
- HWiNFO or CrystalDiskInfo (if you can get into Windows briefly)
Hardware tools:
- Small Phillips screwdriver (if reseating RAM or SSD)
- USB flash drive, 8GB or larger
- External USB keyboard (useful if laptop keyboard is unresponsive in BIOS)
- Anti-static wrist strap (recommended before touching internal components)
Troubleshooting Matrix
| Symptom | Likely Cause | Fast Fix |
| Boots to BIOS every startup | Wrong boot order | Set Windows Boot Manager as first priority |
| BIOS shows no drive detected | SSD/HDD failure or loose cable | Reseat drive or replace |
| Happens after BIOS update | Failed firmware flash | BIOS recovery mode |
| Date/time resets on every boot | Dead CMOS battery | Replace CMOS battery |
| Happens after RAM swap | Incompatible or unseated RAM | Reseat or replace RAM |
| Happens after SSD swap | Drive not formatted as bootable | Reinstall Windows on new SSD |
| Laptop loops BIOS and restarts | Corrupted boot files | Run Startup Repair from USB |
| Only happens on one boot mode | UEFI vs Legacy mismatch | Match boot mode to drive format |
What Causes a Laptop to Get Stuck on the BIOS Screen

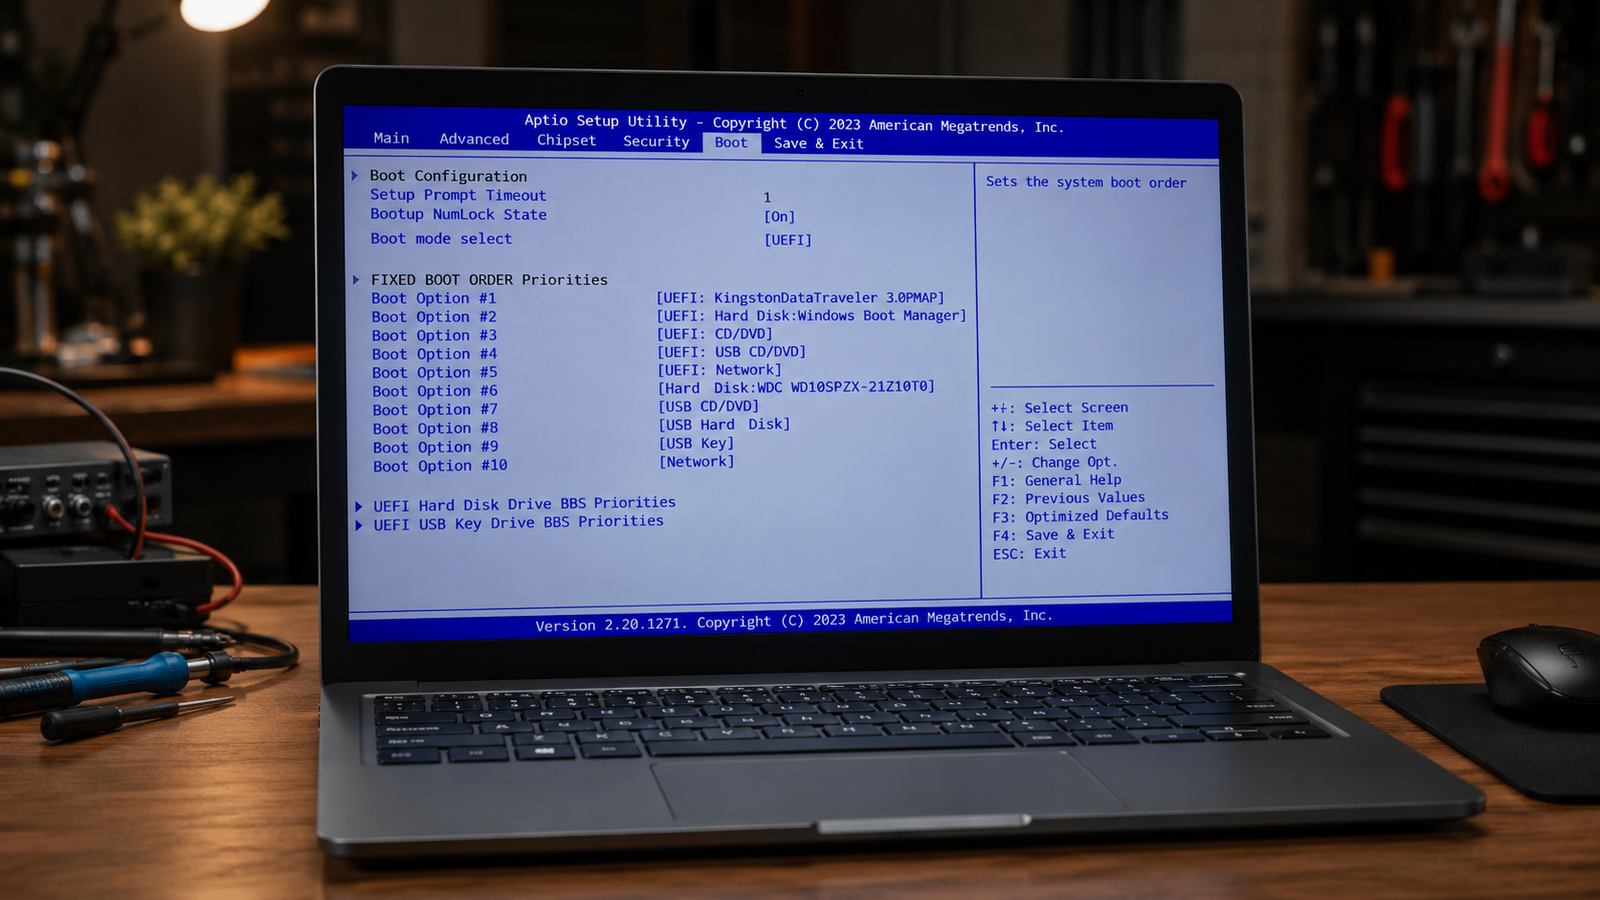
Wrong Boot Order
This is the single most common cause and the easiest fix. The BIOS checks a priority list of devices to boot from, such as USB drives, SD cards, the internal SSD, and network adapters. If a USB drive is plugged in and listed first, the laptop tries to boot from it. When that fails, it falls to the BIOS screen.
The confirmation sign is that BIOS shows Windows Boot Manager in the boot list but it is not set as the first device. Remove all USB drives and external storage, then check the boot priority order.
SSD or HDD Not Detected
If BIOS cannot see your storage drive at all, it has nothing to boot from. This can happen from a loose connection after moving the laptop, physical drive failure, a brand-new unformatted replacement drive, or a driver-mode mismatch (AHCI vs RAID).
Users often assume a missing drive means the drive is dead. In practice, a loose M.2 or SATA connection causes this just as often as hardware failure. Reseating the drive takes two minutes and solves the issue more often than people expect.
Corrupted Windows Boot Files
Windows has a small set of boot files (BCD, bootmgr) that tell the system how to load the operating system. If these get corrupted by a bad update, sudden power loss, or disk error, the BIOS hands off to the drive but Windows cannot complete the load. The laptop either loops back to BIOS or shows a black screen before BIOS.
The confirmation sign is that BIOS detects the drive, Windows Boot Manager appears in the boot list, but the laptop still cannot boot into Windows.
Failed or Interrupted BIOS Update
A BIOS update that gets interrupted by a power cut or a crash leaves the firmware in a broken state. The laptop has no working firmware to complete the startup handoff, so it either freezes on the BIOS splash screen or loops endlessly. This is one of the more serious causes because standard troubleshooting steps will not fix it. You need to use the manufacturer’s BIOS recovery tool.
Dead CMOS Battery
The CMOS battery is a small coin cell on the motherboard that keeps the BIOS clock and settings alive when the laptop is off. When it dies, the BIOS resets to factory defaults on every power cycle. Some laptops will boot normally anyway. Others require you to manually confirm settings each time, and the boot order resets to a state where Windows is not listed first. The clear confirmation sign is the date and time showing January 1, 2000 or some similar factory default date every single time you start the laptop.
RAM Issue After Upgrade or Replacement
When you install new RAM, the BIOS runs a quick memory check at startup. If the RAM is not seated correctly, is incompatible with the motherboard, or is faulty, the BIOS cannot complete the Power-On Self-Test (POST). The laptop can freeze at the BIOS splash screen or produce beep codes. Users frequently push RAM modules in at an angle and think they are seated when they are not.
UEFI vs Legacy Boot Mode Mismatch
Modern laptops use UEFI firmware and require drives to be formatted with GPT partition tables. Older Legacy BIOS mode requires MBR-formatted drives. If you install a new SSD formatted for GPT but your BIOS is set to Legacy boot mode (or vice versa), the laptop cannot recognize it as bootable. This is a very common mistake after SSD upgrades or OS reinstallations where the installer used different partition settings.
Secure Boot Conflict
Secure Boot is a UEFI feature that blocks unauthorized operating systems from loading. If Secure Boot is enabled and you installed an older OS, used a non-signed bootloader, or made certain partition changes, Secure Boot can block the boot process and return you to BIOS. The laptop detects the drive, starts to hand off, then blocks the boot and redirects back to the firmware screen.
What We See Most Often
In a repair shop context, the overwhelming majority of “stuck on BIOS” cases come down to three things: boot order disruption from a USB device left plugged in, a new SSD installed without a Windows reinstall, or corrupted boot files after a failed Windows Update.
BIOS update failures and dead CMOS batteries are less frequent but tend to confuse users the most because they look identical to other causes. The CMOS battery issue in particular gets misdiagnosed constantly because the user sees a “BIOS screen” and assumes something major is wrong, when a two-dollar battery replacement fixes it entirely.
Hardware-level failures like dead motherboards causing this symptom are actually uncommon. Most cases resolve with software or settings changes.
How to Diagnose the Problem

Step 1: Remove all external USB devices and restart
Unplug every USB drive, USB hub, external mouse, and external storage. Restart the laptop and check if it boots normally.
Expected Result: Laptop boots into Windows.
If Failed: Move to Step 2.
Step 2: Enter BIOS and check if your drive is detected
Press the BIOS key at startup (F2, F10, Del, or Esc depending on brand). Navigate to the Storage or Boot section. Confirm whether your SSD or HDD appears.
Expected Result: Drive shows in the device list.
If Failed: Reseat the drive or test with a known-working drive before continuing.
Step 3: Check the boot order
Still inside BIOS, navigate to Boot Priority or Boot Order. Confirm that Windows Boot Manager or your SSD is listed first.
Expected Result: Windows Boot Manager is the top priority device.
If Failed: Set it as first, save and exit (usually F10 to save).
Step 4: Check the BIOS date and time
Inside BIOS, look at the clock. If it shows a date from years ago or a default like 01/01/2000, your CMOS battery is dead.
Expected Result: Date and time are current and accurate.
If Failed: Replace the CMOS battery (CR2032 in most laptops, accessed by removing the back panel).
Step 5: Check boot mode vs drive format
In BIOS, find the Boot Mode setting. Note whether it says UEFI or Legacy (also called CSM). Then check how your drive is partitioned. UEFI mode requires a GPT drive. Legacy requires MBR. A mismatch prevents boot entirely.
Expected Result: Boot mode matches drive partition format.
If Failed: Either switch the BIOS boot mode or reinstall Windows with the correct format for your current BIOS mode.
Step 6: Boot from Windows USB and run Startup Repair
Create a bootable Windows USB using Microsoft’s Media Creation Tool. Boot from it (use F12 or the BIOS boot menu). Choose Repair Your Computer, then Startup Repair.
Expected Result: Startup Repair detects and fixes the boot issue.
If Failed: Proceed to the bootrec command-line fix or consider a clean Windows installation.
Which Fix Usually Works?
| Fix | Typical Success Likelihood | Cost | Difficulty |
| Fix boot order in BIOS | Very Common | Free | Easy |
| Remove USB device causing boot conflict | Very Common | Free | Easy |
| Reseat SSD/RAM | Common | Free | Easy |
| Run Startup Repair from USB | Common | Free | Moderate |
| Run bootrec /fixbcd and /fixmbr | Common | Free | Moderate |
| Replace CMOS battery | Occasional | Under $5 | Easy |
| BIOS recovery after failed update | Occasional | Free | Hard |
| Reinstall Windows | Occasional | Free (if you have a license) | Moderate |
| SSD replacement | Rare | $40 to $120 | Moderate |
| Motherboard repair | Rare | $150 to $400+ | Professional |
Step-by-Step Fixes

Fix 1: Remove External USB Devices and Reboot
Cost: Free
Time: 2 minutes
Difficulty: Easy
Remove every USB device from the laptop: flash drives, external drives, USB hubs, anything. Restart and let the system try to boot normally.
Expected Result: Laptop loads Windows without going to BIOS.
If Failed: Move to Fix 2.
Technician Tip: This works more often than you would think. Technicians regularly get laptops brought in for “BIOS problems” that fix instantly by unplugging a USB drive the user forgot about.
Fix 2: Set the Correct Boot Order in BIOS
Cost: Free
Time: 5 minutes
Difficulty: Easy
- Start the laptop and press the BIOS key repeatedly at the first screen (brand-specific keys listed in the Brand section below).
- Navigate to Boot or Boot Priority using arrow keys.
- Move Windows Boot Manager or your SSD/HDD to the top of the list.
- Press F10 to save and exit.
- Allow the laptop to restart.
Expected Result: Laptop loads Windows on the next restart.
If Failed: Windows Boot Manager may not appear, meaning boot files are corrupted. Move to Fix 4.
Technician Tip: After setting the boot order, disable Fast Boot in BIOS if it is enabled. Fast Boot can sometimes skip device detection and cause the system to land on the BIOS screen on cold boots.
Fix 3: Reseat RAM and SSD
Cost: Free
Time: 10 to 20 minutes
Difficulty: Easy to Moderate
- Power off the laptop completely and unplug the charger.
- Remove the bottom panel using a Phillips screwdriver.
- Locate the RAM sticks and M.2 SSD (or 2.5″ SATA drive).
- Remove each component and reinsert it firmly until it clicks or locks.
- Replace the panel and restart.
Expected Result: BIOS detects the drive and RAM correctly on the next boot.
If Failed: The component may be faulty. Test with a known-working replacement.
Technician Tip: When reseating M.2 SSDs, check that the screw holding the drive down is tight. A slightly loose M.2 can make intermittent contact and cause exactly this symptom.
Expert Warning: Always discharge static by touching a grounded metal object before touching internal components. Static can damage RAM and SSD chips permanently.
Fix 4: Run Windows Startup Repair from USB
Cost: Free (requires a USB drive, 8GB minimum)
Time: 20 to 45 minutes
Difficulty: Moderate
- On a working computer, go to microsoft.com and download the Windows 11 or Windows 10 Media Creation Tool.
- Run the tool and select “Create installation media” then choose your USB drive.
- Insert the USB into the broken laptop and power on.
- Press the boot menu key (F12, F9, or Esc depending on brand) and select the USB drive.
- On the Windows Setup screen, click “Repair your computer” at the bottom left.
- Select Troubleshoot, then Advanced Options, then Startup Repair.
- Let it run and follow any prompts.
Expected Result: Windows detects and repairs the boot configuration automatically.
If Failed: Move to Fix 5 for manual boot file repair.
Technician Tip: If Startup Repair says “it could not repair your PC,” do not give up. That message appears even when the repair did something useful. Restart and check if Windows boots before trying the next fix.
Fix 5: Repair Boot Files Manually Using Command Prompt
Cost: Free
Time: 15 to 30 minutes
Difficulty: Moderate
- Boot from the Windows USB as described in Fix 4.
- At the Repair screen, select Troubleshoot, Advanced Options, Command Prompt.
- Type these commands in order, pressing Enter after each:
bootrec /fixmbr
bootrec /fixboot
bootrec /scanos
bootrec /rebuildbcd
- If bootrec /fixboot returns “Access is Denied,” type:
diskpart
select disk 0
list partition
Find the EFI partition (usually 100 to 500MB, formatted as FAT32), then type:
select partition [number]
assign letter=Z
exit
bcdboot C:\Windows /s Z: /f UEFI
- Close Command Prompt and restart the laptop.
Expected Result: Windows boot files are rebuilt and the laptop loads normally.
If Failed: Boot files may be on a drive with physical damage. Move to SSD testing.
Technician Tip: The bcdboot command is the more reliable fix on UEFI systems. The bootrec commands work better on Legacy MBR setups. Know which mode your laptop uses before you start.
Fix 6: Replace the CMOS Battery
Cost: $2 to $8 for a CR2032 battery
Time: 15 to 30 minutes
Difficulty: Easy to Moderate
- Power off and unplug the laptop.
- Remove the bottom panel.
- Locate the CMOS battery (a silver coin cell, usually CR2032, plugged in or clipped to the motherboard).
- Remove it and wait 60 seconds.
- Insert a new CR2032 battery.
- Reassemble, boot into BIOS, set the correct date and time, then set the correct boot order.
- Save and exit.
Expected Result: BIOS retains settings across reboots and boots normally.
If Failed: The CMOS socket itself may be damaged, or another problem is causing the settings to reset.
Technician Tip: Even if the CMOS battery is not dead, removing it for 60 seconds clears BIOS settings completely. This acts as a BIOS reset and sometimes clears configuration issues that were preventing normal boot.
Fix 7: BIOS Recovery After a Failed Update
Cost: Free
Time: 30 to 60 minutes
Difficulty: Hard
This fix is brand-specific. General steps are below, but follow your manufacturer’s official recovery documentation.
- Download the correct BIOS file for your exact laptop model from the manufacturer’s official website, on a working computer.
- Copy it to a FAT32-formatted USB drive, renamed exactly as required by the manufacturer (e.g., “BIOS.fd” for ASUS, or a specific filename for HP).
- Shut down the broken laptop completely.
- Hold the BIOS recovery key combination while powering on. Brand-specific combinations are in the Brand section below.
- The laptop should detect the USB drive and begin flashing the firmware automatically.
- Do not interrupt this process. Let it complete fully before the laptop restarts.
Expected Result: Firmware is restored and the laptop boots normally.
If Failed: The motherboard may need a professional BIOS chip rewrite using a programmer tool.
Expert Warning: Using the wrong BIOS file for your model will cause permanent motherboard damage. Verify the exact model number from the sticker on the bottom of the laptop before downloading anything.
Fix 8: Reinstall Windows
Cost: Free if you have a Windows license already
Time: 45 to 90 minutes
Difficulty: Moderate
Use this fix when boot files cannot be repaired and the SSD is physically healthy.
- Boot from the Windows USB created in Fix 4.
- This time, click Install Now instead of Repair.
- Select Custom Install when prompted.
- Delete all existing partitions on the target drive and let Windows create fresh ones.
- Complete the installation.
Expected Result: Fresh Windows installation with clean boot files.
If Failed: If setup cannot detect the drive, the SSD has failed and needs replacement.
Technician Tip: Before reinstalling, try the repair options first. A reinstall wipes all data. Always confirm the SSD is physically healthy using BIOS diagnostics before assuming a reinstall will solve anything.
Mistakes That Make the Problem Worse
Pressing random BIOS keys and saving unknown settings. Users get into BIOS, change settings they do not understand, and save. A wrong change to AHCI/RAID mode, Secure Boot, or boot mode can prevent the drive from showing up at all. If you are not sure what a setting does, do not change it.
Flashing the wrong BIOS version. Downloading a BIOS update for a similar but different laptop model is one of the fastest ways to permanently brick a motherboard. Always match the BIOS file to your exact model number and sub-revision.
Running bootrec on a UEFI system expecting MBR results. The bootrec /fixmbr command targets MBR partitions. Running it on a UEFI/GPT system does nothing useful and can cause confusion when the user thinks the repair “ran fine” but the problem persists.
Reinstalling Windows before testing the SSD. If the SSD has bad sectors or is failing, a fresh Windows installation will fail too, sometimes partway through. You end up with a partially installed OS and a corrupted drive. Test the drive first.
Replacing components without reseating existing ones. Buying new RAM or a new SSD before confirming the existing hardware is actually faulty wastes money. Reseat everything before ordering parts.
Ignoring the BIOS date/time. A date reset on every boot is a clear CMOS battery signal. Users often overlook it and spend hours on boot file repairs that will not help, because the BIOS keeps resetting the boot order on every power cycle.
Enabling Legacy/CSM mode on a drive formatted for UEFI. This causes the drive to become undetectable in boot mode. Switching boot modes without understanding partition format breaks the setup further.
Brand-Specific Considerations
Dell
The BIOS key on Dell laptops is F2 at startup. The boot menu is F12. Dell uses a built-in SupportAssist diagnostics tool, accessible by pressing F12 and selecting Diagnostics. Use this before doing anything else, as it tests RAM and SSD without needing Windows.
For BIOS recovery on Dell, hold Ctrl + Esc while powering on (on most modern Dell models). Dell’s BIOS recovery looks for a file named “BIOS_IMG.rcv” on a USB drive formatted as FAT32.
Dell Inspiron and XPS models sometimes have a known issue where the M.2 SSD slot stops detecting drives after aggressive power management settings are applied. Resetting BIOS to factory defaults fixes this.
HP
The BIOS key on HP laptops is F10 or Esc followed by F10. The boot menu is F9. HP includes a built-in BIOS recovery called HP Sure Start on business-class models (EliteBook, ProBook), which can automatically recover from a failed BIOS update without any USB drive.
For consumer models, HP’s BIOS recovery requires holding Windows key + B while connecting power. This activates BIOS update mode from a USB drive containing the BIOS .bin file.
HP Pavilion laptops have a documented issue where the BIOS boot order resets after Windows updates on certain UEFI configurations. If this keeps happening, update the BIOS firmware first.
Lenovo
The BIOS key on Lenovo ThinkPads is F1. On IdeaPad models it is F2 or Fn + F2. The boot menu is F12. Lenovo’s recovery tool is called OneKey Recovery (consumer) or Rescue and Smart Recovery (ThinkPad).
ThinkPad models have a dedicated BIOS chip recovery mode using a “BIOS Crisis Recovery Disk” available from Lenovo support. Create it on a USB using Lenovo’s official tool.
Some Lenovo IdeaPad models ship with a Novo button (a small pinhole near the power port) that opens a recovery menu without needing to press keyboard keys at boot. Use a pin to press it.
ASUS
The BIOS key on ASUS laptops is F2. The boot menu is Esc or F8. ASUS uses a BIOS recovery called ASUS EZ Flash, accessible from within the BIOS interface when a USB with a BIOS file is connected.
ASUS laptops have a known issue where Intel Rapid Storage Technology (RST) settings conflict with standard AHCI mode after a Windows reinstall. If the SSD disappears after a reinstall, check whether BIOS is set to RAID mode and switch to AHCI.
For crashed BIOS recovery, ASUS uses the CrashFree BIOS feature. Place the BIOS file (named exactly as required for your model) on a USB drive and power on while holding the USB in.
Acer
The BIOS key on Acer laptops is F2 or Delete. The boot menu is F12. Acer uses a recovery called Acer eRecovery Management on older models and Acer Care Center on newer ones.
Acer budget laptops (Aspire series) are more prone to CMOS battery failure within three to four years. If boot order keeps resetting on an older Acer, check the CMOS battery first before anything else.
For BIOS recovery, Acer requires the BIOS file to be placed on a USB drive formatted as FAT32. Power on while holding Fn + Esc to trigger recovery mode on most models.
MSI
The BIOS key on MSI laptops is Delete or F2. The boot menu is F11. MSI laptops aimed at gaming have more aggressive boot settings and often have Secure Boot disabled by default, which can cause boot issues if you install a fresh Windows copy expecting Secure Boot to be on.
MSI’s BIOS recovery key is typically the M-Flash utility accessible from within BIOS. For a completely failed BIOS, MSI uses a USB recovery with a specific BIOS file and the Fn + F3 combination at power-on.
Repair Shop Diagnosis

When a laptop comes in for a “stuck on BIOS screen” complaint, the first thing a technician checks is whether the drive appears in BIOS and whether the boot order makes sense. That takes about two minutes and rules out the majority of causes.
If the drive is not detected, the technician reseats it and retests. If it still does not appear, a USB-to-SATA or USB-to-M.2 adapter is used to plug the drive into another laptop and test it externally. A healthy drive will show up and allow data access. A failed drive will either not appear or show read errors.
If boot files are the cause, Startup Repair from USB and bootrec commands fix the problem in most cases. When those fail, the technician runs chkdsk from Command Prompt to check for disk errors before attempting a reinstall.
BIOS flash failures require brand-specific recovery tools. Most repair shops carry manufacturer-specific recovery USB drives for common models. For motherboard-level BIOS chip failures, a BIOS chip programmer is used to reflash the chip directly.
Typical repair costs:
- Boot order fix or CMOS battery: $0 to $40 at most shops
- Boot file repair via Startup Repair: $40 to $80
- Windows reinstall: $60 to $120
- SSD replacement plus Windows install: $100 to $200 depending on drive size
- BIOS chip reflash: $100 to $250
- Motherboard replacement: $150 to $500 depending on model
When Hardware Replacement Is Necessary
SSD failure: If the drive does not appear in BIOS after reseating and also fails to show up on an external adapter, replace it. Try to get the same interface (M.2 NVMe, M.2 SATA, or 2.5″ SATA) and a capacity at or above the original.
RAM failure: If the laptop does not complete POST (no BIOS screen at all, or BIOS screen with beep codes), and reseating does not help, test with a known-working RAM module. Faulty RAM can prevent proper BIOS initialization.
CMOS battery: If date and time reset on every boot and a new CR2032 does not hold the setting, the CMOS socket or circuit on the motherboard may be faulty. This requires professional soldering in most cases.
Motherboard failure: If none of the above fixes work, the SSD is confirmed healthy externally, and BIOS recovery has been attempted, the motherboard is the likely cause. On most budget laptops, motherboard replacement costs more than the machine is worth. On premium or recent models, it may be worthwhile.
Stop Troubleshooting and Seek Professional Repair If
You smell burning. Power the laptop off immediately. Do not reconnect power until a technician inspects it. Burning smell typically indicates a short circuit, a blown capacitor, or damaged power delivery components.
The battery is visibly swollen. A puffed battery is a fire risk. Do not compress it, puncture it, or attempt to charge the laptop. Remove the battery (if removable) and take it to a repair shop or recycling center.
Liquid damage is present. Water and electronics do not mix. Corrosion from liquid damage spreads over time and causes increasing failures. Do not power on a liquid-damaged laptop before a technician cleans and inspects the board.
The laptop shuts off within seconds of booting. Immediate shutdowns after power-on can indicate a short, thermal protection triggering, or a failing power rail. Standard software fixes will not help.
The motherboard has visible damage. Burnt traces, cracked chips, or corroded contacts require professional repair or board-level diagnostics. A home technician attempting this without equipment typically causes further damage.
The laptop produces repetitive beep codes at startup. Beep codes mean a hardware component failed POST in a way that prevents the system from proceeding at all. RAM and GPU failures are common causes.
Prevention Tips

Never interrupt a BIOS update. Connect the laptop to power before starting, close all background apps, and let the update finish completely. A power cut during a BIOS flash is one of the most avoidable causes of a bricked firmware.
Remove USB drives before shutting down. Plugged-in USB drives can disrupt the boot order, especially on laptops with USB listed high in boot priority. Make it a habit to eject external devices before powering off.
Run chkdsk every few months. Open Command Prompt as administrator and run chkdsk C: /f /r. This catches file system errors and bad sectors before they corrupt boot files. Schedule it if you tend to forget.
Keep BIOS firmware updated. Manufacturers push BIOS updates that fix boot stability bugs, hardware compatibility issues, and security vulnerabilities. Check your manufacturer’s support page twice a year.
Replace the CMOS battery proactively on laptops over four years old. A CR2032 battery costs almost nothing. Replacing it before it dies prevents unpredictable boot order resets that can look like serious failures.
Use a UPS or surge protector. Sudden power cuts during write operations corrupt boot files. A basic UPS gives you time to shut down safely during an outage.
Back up before any hardware upgrade. Before swapping an SSD or RAM, clone the drive and keep a bootable Windows USB ready. Recovery becomes trivial if something goes wrong.
Frequently Asked Questions

Why does my laptop keep going to the BIOS screen every time I turn it on?
The most common reason is that the boot order in BIOS is not set correctly, so the laptop cannot find Windows. Enter BIOS settings, check Boot Priority, and move Windows Boot Manager or your SSD to the top of the list. Save and restart.
My BIOS does not show my SSD at all. What does that mean?
Either the SSD is not seated properly, the cable is loose (on 2.5″ SATA drives), or the drive has failed. Start by reseating the SSD. If it still does not appear, test it using an external USB adapter on another computer.
Can a BIOS update cause a laptop to get stuck on the BIOS screen?
Yes, and this is one of the harder causes to fix. A failed BIOS update leaves the firmware in a broken state. You need to use your manufacturer’s BIOS recovery method, which involves a specific USB file and a key combination at power-on.
How do I get into BIOS if my laptop just keeps booting back into the BIOS screen?
You are already in BIOS if you are seeing the BIOS utility or setup screen. Use the arrow keys to navigate and look for the Boot or Boot Priority section. If you are seeing a splash screen that returns to a black screen, press the BIOS key (F2, F10, Del, or Esc depending on brand) immediately at the very first moment the screen turns on.
Is it safe to reset BIOS to factory defaults?
Yes, in most cases. Load Default Settings or Load Optimized Defaults is a standard option in every BIOS menu. This resets the boot order, so you will need to manually set it back to your SSD or Windows Boot Manager afterward. It will not erase your Windows installation or personal files.
What if Startup Repair does not fix the problem?
Move to manual boot repair using the bootrec commands in Command Prompt via the Windows USB. If those also fail, check the drive for errors using chkdsk C: /f /r from Command Prompt. If the drive has bad sectors, replacement and a fresh Windows install are the next steps.
How long does a BIOS recovery take?
Most BIOS recovery flashes complete in 10 to 20 minutes. The laptop will restart automatically when it finishes. Do not power it off during this time under any circumstances. Keep it plugged in and wait until it completes.
My laptop is brand new and it booted straight to BIOS. Is it defective?
Not necessarily. A new laptop landing on the BIOS screen usually means Windows was not pre-installed, or the boot drive is not set correctly from the factory. Check whether the drive is detected, set it as the boot priority, and see if a Windows setup begins. If the drive is completely missing on a new unit, contact the retailer or manufacturer.
Conclusion
A laptop stuck on the BIOS screen almost always comes down to a boot order issue, an undetected drive, or corrupted boot files. Work through the fast diagnosis steps first to identify which one applies before trying any fix. For the majority of users, setting the correct boot priority in BIOS or running Startup Repair from a Windows USB resolves the problem in under an hour. Hardware replacement is only necessary when the SSD has genuinely failed or the BIOS firmware is corrupted beyond software recovery.