
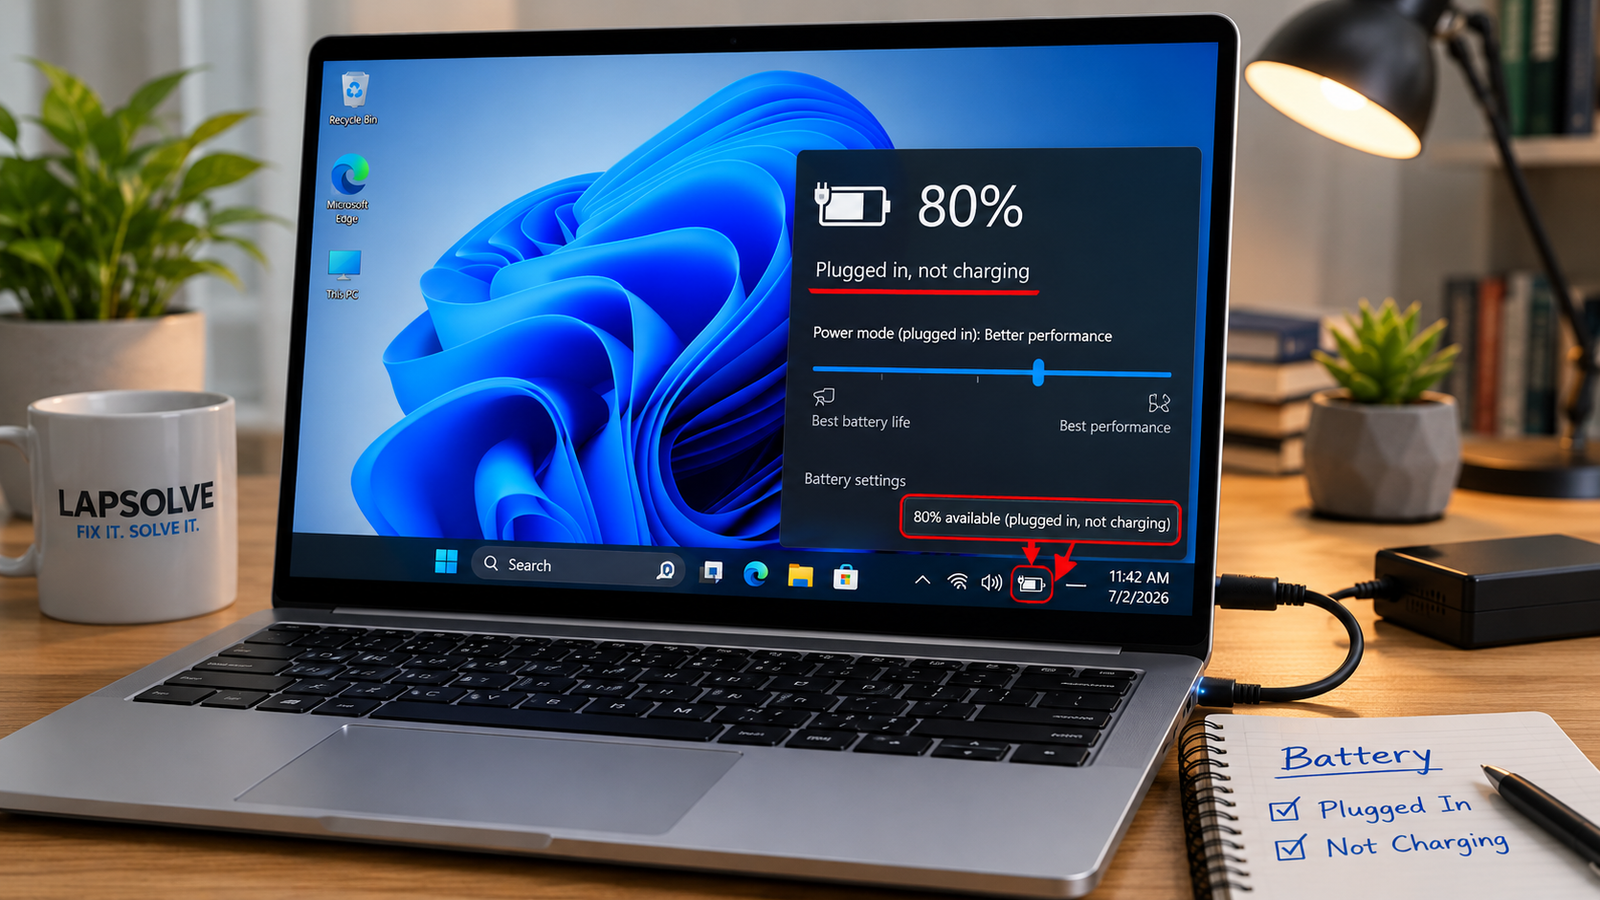
Quick Answer
The most common reason a laptop battery stops short of 100% is an intentional charge limit called conservation mode, enabled in your manufacturer’s software or BIOS. Check Lenovo Vantage, MyASUS, Dell Power Manager, or HP’s BIOS Battery Health Manager first. If no limit is active, reinstall the ACPI battery driver in Device Manager, then run a BIOS update.
Introduction
You plug in your laptop, walk away, and come back to find it sitting at 80%. The charger is connected, the cable is fine, the wall outlet works, and yet the battery refuses to climb higher. It is frustrating, especially when you genuinely need full charge for a long trip or a busy day off-grid.
Here is the thing most guides miss right away: stopping at 80% or 95% is not always a malfunction. Modern laptops from Lenovo, Dell, HP, ASUS, and MSI all ship with battery protection features that intentionally cap charging to extend the battery’s long-term lifespan. The fix for that situation takes about thirty seconds. The fix for an actual hardware or driver problem takes longer.
This guide walks you through every cause in order of likelihood, so you can stop the right problem instead of chasing the wrong one.
Symptoms of the Problem

- Battery charges normally up to a set point (usually 60%, 80%, or 95%) and then stops
- Battery indicator shows “Plugged in, not charging” even though the charger is connected
- Laptop charges all the way to 100% very quickly, then drops when unplugged (calibration drift)
- Battery gets stuck at 99% and never completes
- Battery charges fine to a limit, then the laptop switches to AC power while showing the battery icon
- Full charge capacity in the battery report is far below the design capacity
- Charging takes significantly longer than it used to
- Battery percentage drops rapidly despite showing full or near-full
Start Here: Fast Diagnosis
Work through this decision tree before touching any settings.
Did your battery recently start stopping at exactly 80%?
Check your manufacturer app first: Lenovo Vantage, MyASUS, Dell Power Manager, or HP BIOS. If conservation mode is on, that is your answer. Disable it and you are done.
Did it start stopping at 80% after a Windows update?
The update may have re-enabled a battery management setting or corrupted the ACPI driver. Go to Fix 3 (ACPI driver reinstall) and Fix 6 (BIOS update).
Is the battery stopping at a non-round number like 84%, 91%, or 96%?
This points to battery degradation or calibration drift, not a software cap. Run powercfg /batteryreport and check Full Charge Capacity vs Design Capacity.
Does the battery show 100% but die quickly when unplugged?
The charging cap is not your problem. Battery calibration drift is. Skip to Fix 4.
Is the laptop less than six months old and you never set any charge limit?
Check BIOS. Some laptops ship with conservation mode active by default.
Is the laptop more than two years old and nothing has changed in settings?
Battery wear is the most likely cause. Run the battery report before doing anything else.
Tools Needed
Built-in tools:
- Windows Command Prompt (Admin) for
powercfg /batteryreport - Device Manager (battery driver reinstall)
- Windows Settings > System > Power and Battery (Windows 11)
- BIOS / UEFI (F2, F10, F12, or Delete on boot, depending on brand)
Software tools:
- Lenovo Vantage (Lenovo laptops)
- MyASUS app (ASUS laptops)
- Dell Power Manager or Dell Optimizer (Dell laptops)
- HP Support Assistant or HP Battery Manager (HP business laptops)
- MSI Center / Dragon Center (MSI laptops)
- Acer Care Center (Acer laptops)
Hardware tools (only needed if hardware replacement is suspected):
- Replacement battery (OEM or certified third-party)
- Plastic spudger and Phillips screwdriver for battery access
Troubleshooting Matrix
| Symptom | Likely Cause | Fast Fix |
|---|---|---|
| Stops exactly at 80% | Conservation mode / charge limit active | Disable via manufacturer app or BIOS |
| Stops exactly at 60% | ASUS Maximum Lifespan Mode or Lenovo Conservation Mode | Disable or switch to Balanced mode |
| Stops at a random % like 86% or 91% | Battery wear or calibration drift | Run battery report, consider calibration |
| Plugged in, not charging at all | ACPI driver issue or faulty charger | Reinstall ACPI driver, test alternate charger |
| Charges to 100% but drains in minutes | Severe battery wear or calibration error | Battery report, likely replacement needed |
| Stuck at 99% forever | Calibration drift or slow top-up behavior | Normal in some cases; calibrate if persistent |
| Happened after a Windows update | Driver conflict or reset charge limit | Reinstall ACPI driver, check BIOS |
| Laptop gets hot and stops charging | Thermal protection throttling charge | Clean vents, charge in cooler environment |
What Causes Battery to Stop Charging Before 100%

Cause 1: Conservation Mode or Charge Limit Is Active
This is the number one cause we see, and most users have no idea it exists.
Laptop manufacturers build charge-limiting software into their management apps. Lenovo calls it Conservation Mode. ASUS calls it Battery Care Mode. Dell calls it Primarily AC Use or Custom Charge. The purpose is legitimate: keeping a lithium-ion battery at 100% for extended periods accelerates cell degradation. So the software stops charging at 60% or 80% and holds it there while the laptop runs off AC power.
The giveaway is that the battery stops at a clean, round percentage every single time. If your laptop always stops at exactly 80%, conservation mode is almost certainly on. The confirmation sign is finding it toggled on inside your manufacturer’s app.
Cause 2: Battery Wear and Reduced Full Charge Capacity
Lithium-ion batteries degrade over time. After enough charge cycles, the battery can no longer reach its original capacity. A battery designed to hold 60,000 mWh might now only reach 42,000 mWh at “full charge.” Windows still calls it 100%, but in physical terms it is only 70% of what it used to be.
How to identify it: run powercfg /batteryreport and compare Design Capacity against Full Charge Capacity. If Full Charge Capacity has dropped more than 20-25% below Design Capacity, the battery is worn. No software fix restores lost physical capacity. The confirmation sign is a battery report showing steady capacity decline over months.
Cause 3: ACPI Battery Driver Glitch
The Microsoft ACPI-Compliant Control Method Battery driver manages communication between Windows and the battery controller. When this driver becomes corrupted or conflicts with a Windows update, charging behavior goes wrong. The battery might stop charging at an arbitrary percentage, show “plugged in, not charging,” or report inaccurate capacity numbers.
How to identify it: the problem often starts right after a Windows update. The confirmation sign is that uninstalling and reinstalling the driver (letting Windows rediscover it on reboot) restores normal charging. If it does not, the driver was not the root cause.
Cause 4: BIOS Battery Health Settings
Some laptops have battery charge thresholds set inside BIOS itself, independent of any Windows software. On HP business laptops, the Battery Health Manager in BIOS can limit charging to roughly 80%. On Dell laptops, modes like “Primarily AC Use” or custom thresholds sit in BIOS and persist even if you reinstall Windows.
How to identify it: the software apps show no limit active, but the battery still stops short of 100%. Enter BIOS and check for any power management or battery health section. The confirmation sign is finding an active limit in the BIOS battery settings.
Cause 5: Faulty or Underpowered Charger
A charger that delivers insufficient wattage can charge a battery to a point but fail to push it to 100%, especially under load. This happens most often with third-party USB-C chargers rated too low for the laptop’s power draw, or with official chargers that have developed an intermittent fault.
How to identify it: the battery charges slowly and stalls well below 100%, or the charging rate in the battery report shows lower input than expected. Try the original OEM charger if you have been using a third-party one. The confirmation sign is normal charging behavior with the correct charger.
Cause 6: Calibration Drift
Over time, the battery’s internal fuel gauge loses track of the battery’s true capacity range. The controller thinks 100% is reached when the battery is actually at 87%, or it thinks 0% is reached when there is still charge remaining. This is not the same as actual capacity loss. The physical cells are fine; the measurement is wrong.
How to identify it: battery percentage jumps erratically, the laptop shuts down suddenly at 20-30% (or seems to “finish charging” too fast), or the battery report shows inconsistent data rather than a steady capacity decline curve. The confirmation sign is behavior that improves after a proper calibration cycle.
Cause 7: Thermal Throttling During Charging
When a laptop overheats, the charging controller deliberately slows or suspends charging to protect the battery from heat damage. Charging while running demanding tasks generates more heat than the cooling system can manage, so the system limits input power. The battery stops rising above whatever level it was at when thermal protection kicked in.
How to identify it: the issue happens specifically when the laptop is hot, under load, or sitting on soft surfaces that block vents. Moving the laptop to a cooler surface, cleaning the vents, and not gaming while charging usually resolves it. The confirmation sign is normal charging behavior when the laptop is idle and at room temperature.
Cause 8: Worn or Failing Battery Hardware
Physical battery failure is distinct from normal wear. A cell within the battery pack may have failed, the charging circuit may be faulty, or the battery connector may have a bad contact. In these cases no software fix works and the behavior is unpredictable rather than stopping at a clean threshold.
How to identify it: charging stops at random, inconsistent percentages. The battery report shows wildly fluctuating Full Charge Capacity rather than a gradual decline. The confirmation sign is a manufacturer diagnostic tool reporting a battery fault code.
What We See Most Often
In the shop, the overwhelming majority of “battery won’t charge to 100%” complaints turn out to be one of two things: conservation mode the user never knowingly enabled, or a battery that has degraded enough that Windows is reporting a lower effective ceiling.
Conservation mode catches people out especially on new Lenovo laptops. It ships enabled on many ThinkPad and IdeaPad models, and users do not discover it until they notice the battery never gets past 80%. Disabling it in Lenovo Vantage solves the problem instantly.
The second most common scenario is a laptop that is two or three years old. The user has never changed any settings, but the battery’s Full Charge Capacity has quietly dropped to 70-75% of its design capacity. Windows still calls it 100%, but the real-world runtime is noticeably shorter. The battery report makes this immediately visible.
Driver issues after Windows updates are the third most common, and they are usually the easiest pure software fix. Reinstalling the ACPI driver takes about three minutes and resolves the problem a significant portion of the time.
How to Diagnose the Problem

Step 1: Run the Battery Report
Open Command Prompt as administrator. Type powercfg /batteryreport /output "C:\battery-report.html" and press Enter. Open the file in a browser. Look at the Installed Batteries section: compare Full Charge Capacity to Design Capacity.
Expected Result: If Full Charge Capacity is within 10-15% of Design Capacity, the battery cells are physically healthy.
If Failed: Full Charge Capacity is more than 25-30% below Design Capacity. Battery wear is confirmed. Continue to Fix 9 (battery replacement).
Step 2: Check Manufacturer App for Charge Limit
Open Lenovo Vantage, MyASUS, Dell Power Manager, or your brand’s equivalent. Navigate to the Battery or Power section. Look for Conservation Mode, Battery Care Mode, Charge Limit, or similar options.
Expected Result: You find a charge limit toggled on. Disable it, unplug and replug the charger, and charging resumes to 100%.
If Failed: No limit found in the app. Move to Step 3.
Step 3: Check BIOS Battery Settings
Restart and enter BIOS (F2, F10, F12, or Delete depending on brand). Look for Power Management or Battery section. Check for Battery Health Manager, Adaptive Battery Optimizer, or custom charge thresholds.
Expected Result: A charge limit is active in BIOS. Set it to Standard charging or 100% and save.
If Failed: No limit in BIOS either. Move to Step 4.
Step 4: Check Device Manager for Driver Issues
Open Device Manager. Expand the Batteries section. If you see a yellow warning icon on the Microsoft ACPI-Compliant Control Method Battery entry, the driver has an issue. Even without a warning icon, right-click the entry and check driver status.
Expected Result: Driver is functioning correctly. Move to Fix 3 to reinstall it anyway if the issue started after a Windows update.
If Failed: Yellow warning icon confirms driver fault. Proceed with Fix 3 immediately.
Step 5: Test a Different Charger
If you have access to the official OEM charger and have been using a third-party one (or vice versa), swap chargers and monitor whether the battery climbs past its previous cutoff point.
Expected Result: Battery now charges past the previous ceiling. The charger was the issue.
If Failed: Same behavior with a confirmed OEM charger. Hardware or deeper software issue. Continue to Fix 5 and Fix 6.
Which Fix Usually Works?
| Fix | Typical Success Likelihood | Cost | Difficulty |
|---|---|---|---|
| Disable conservation mode (app) | Very Common | Free | Easy |
| Disable charge limit (BIOS) | Common | Free | Easy |
| Reinstall ACPI battery driver | Common | Free | Easy |
| Battery calibration | Occasional | Free | Medium |
| BIOS update | Occasional | Free | Medium |
| Replace charger | Occasional | $25-$80 | Easy |
| Battery replacement | Rare (but definitive) | $40-$120 | Medium-Hard |
Step-by-Step Fixes

Fix 1: Disable Conservation Mode or Battery Charge Limit (Manufacturer App)
Cost: Free Time: 2-5 minutes Difficulty: Easy
Lenovo: Open Lenovo Vantage. Go to Device > Power > Battery. Find “Conservation Mode” and toggle it off. Unplug and replug the charger.
ASUS: Open MyASUS. Go to Customization > Power and Performance. Find Battery Health Charging or Battery Care Mode. Switch from Maximum Lifespan Mode (60%) or Balanced Mode (80%) to Full Capacity Mode. If you want a one-time full charge without changing the setting permanently, use Instant Full-Charge Mode.
Dell: Open Dell Power Manager (available from Microsoft Store). Go to Battery Information > Settings. Change from “Primarily AC Use” or a custom threshold back to Standard charging. Some newer Dell models have moved this setting into Dell Optimizer or the BIOS exclusively.
MSI: Open MSI Center (formerly Dragon Center). Click the Battery icon. Switch from Balanced (80%) or Best for Battery (60%) to Best for Mobility (100%).
Acer: Open Acer Care Center. Go to Battery Charge Limit and toggle it off.
Expected Result: Battery charges past the previous cutoff and reaches 100%.
If Failed: The limit was not the cause, or a BIOS-level limit is overriding the app. Move to Fix 2.
Technician Tip: If you primarily use your laptop at a desk plugged in all day, keeping conservation mode on is actually the smarter long-term choice. It extends battery lifespan significantly. Only disable it before trips where you genuinely need full runtime.
Fix 2: Disable Charge Limit in BIOS
Cost: Free Time: 5-10 minutes Difficulty: Easy-Medium
HP: Shut down. Power on and press F10 repeatedly to enter BIOS Setup. Navigate to Advanced > Power Management Options. Find Battery Health Manager or Adaptive Battery Optimizer. Change to “Let HP manage my battery charging” or set it to Standard. Press F10 to save and exit.
Dell: Restart and press F2 to enter BIOS. Go to Settings > Power Management. Find Battery Charge Configuration. Change from Primarily AC Use or Custom back to Standard or Adaptive. Press F10 to save.
Lenovo ThinkPad (BIOS method): Restart and press F1 or Enter to enter BIOS. Go to Config > Power. Find Battery Charge Threshold. Set start and stop values to 95 and 100 (or disable the threshold feature entirely). Save with F10.
Surface: Surface devices have a Battery Limit Mode in BIOS that caps charge at 50%. Restart and press Volume Up + Power to enter UEFI. Navigate to the Battery section and disable Battery Limit Mode.
Expected Result: After saving BIOS and booting back into Windows, the battery charges past the previous cutoff point.
If Failed: No battery limit was active in BIOS. The problem is elsewhere. Move to Fix 3.
Expert Warning: Do not change any other BIOS settings you are not certain about. BIOS changes affect your entire system. Only touch power management or battery sections.
Fix 3: Reinstall the ACPI Battery Driver
Cost: Free Time: 5 minutes Difficulty: Easy
Keep the laptop plugged in throughout this process.
Open Device Manager (right-click Start > Device Manager). Expand the Batteries section. Right-click “Microsoft ACPI-Compliant Control Method Battery” and select Uninstall device. Confirm the uninstall. Do not restart yet.
In Device Manager, click Action in the top menu and select Scan for hardware changes. Windows will reinstall the driver automatically. Now restart the laptop. After restart, check the battery percentage and whether charging continues past the previous cutoff.
Expected Result: Battery driver reinstalls cleanly and charging behavior returns to normal within one to two charging cycles.
If Failed: The ACPI driver was not the root cause. The battery itself or the charger needs investigation. Move to Fix 4.
Technician Tip: If the problem returns after the next Windows update, configure Windows Update to not automatically update drivers. Go to Settings > System > About > Advanced System Settings > Hardware > Device Installation Settings, and select “No” for automatic driver downloads.
Fix 4: Calibrate the Battery
Cost: Free Time: 4-8 hours (mostly passive) Difficulty: Medium
This fix addresses calibration drift, not actual capacity loss. If the battery report shows Full Charge Capacity well below Design Capacity, calibration will not help. Calibration only corrects the fuel gauge, not the physical cells.
Open Power Options (search for it in the Start menu). Change “Turn off display” and “Put the computer to sleep” to Never for both battery and plugged in. Under Advanced Power Settings, expand Battery, find Critical battery level, and set it as low as possible (1% if available). Set Critical battery action to Hibernate.
Plug in the laptop and charge it all the way to 100%. Once it shows 100%, leave it plugged in for two more hours. Unplug and use the laptop normally (or stream video) until it shuts down automatically from low battery. Leave it powered off and unplugged for 3-5 hours. Plug back in and charge, without interruption, all the way to 100%. Restore your previous power plan settings.
Expected Result: Battery percentage reporting becomes accurate. Charging now correctly shows 100% at the proper physical charge level.
If Failed: Calibration made no difference. The battery has genuine capacity loss that cannot be fixed in software. Move to Fix 9 (replacement).
Expert Warning: Only do this calibration process once every few months at most. Deep discharge cycles accelerate lithium-ion battery degradation. This is a diagnostic and correction step, not routine maintenance.
Fix 5: Test and Replace the Charger
Cost: $0 (test) to $25-$80 (replacement) Time: 5 minutes Difficulty: Easy
Borrow a confirmed working OEM charger for your laptop model and test whether charging behavior changes. Pay attention to whether the battery climbs past the previous cutoff point.
If you are using a USB-C charger, verify it is rated for your laptop’s wattage requirement. A 45W USB-C charger trying to run a 65W laptop cannot fully charge under load. Check your laptop’s original power brick for the wattage and match it.
Inspect the charging cable and the barrel connector or USB-C port for physical damage, bent pins, or debris. Use compressed air to clear dust from the charging port. If the cable is frayed near the connector, that intermittent contact is enough to stop charging short of full.
Expected Result: Swapping to the correct OEM charger resolves the charging cutoff.
If Failed: The charger is not the issue. Move to Fix 6.
Technician Tip: Third-party USB-C chargers that are not Power Delivery compliant may charge slowly but will often stall out at 80-90% under load. Always buy USB-C chargers that explicitly list PD (Power Delivery) support and the correct wattage for your model.
Fix 6: Update BIOS and Chipset Drivers
Cost: Free Time: 20-40 minutes Difficulty: Medium
Outdated BIOS firmware can cause the battery controller to misreport charge levels or apply charging limits incorrectly. This is especially common on models that had a known charging bug fixed in a later firmware release.
Go to your laptop manufacturer’s support site and search by model number. Download the latest BIOS update.
Dell: Go to dell.com/support, enter your Service Tag, and look for BIOS updates under the Drivers section. Run the installer from within Windows.
HP: Go to hp.com/support, find your model, go to Drivers, select BIOS, and download the latest. Keep the charger connected throughout the update.
Lenovo: Open Lenovo Vantage and check the System Update section. ThinkPad users can also use Lenovo’s standalone BIOS update utility.
ASUS: Open MyASUS and check for system updates, or download BIOS from the ASUS support page for your exact model.
Do not interrupt a BIOS update. Keep the laptop plugged in until the update completes and the system reboots.
After the BIOS update, also update chipset drivers from the same support page. Chipset drivers handle power management communication between hardware and Windows.
Expected Result: Charging behavior normalizes after the BIOS update. The battery reaches 100% within one or two charge cycles.
If Failed: BIOS and drivers are current and the problem persists. The issue is hardware. Proceed to Fix 7 or Fix 9.
Fix 7: Check for Overheating (Thermal Charging Throttle)
Cost: Free (or $5-$20 for compressed air) Time: 15-30 minutes Difficulty: Easy
If the laptop charges fine when idle but stops short of 100% during gaming or heavy work, thermal protection is throttling the charging input.
Shut down the laptop. Use a can of compressed air to clear the exhaust vents on the bottom and sides. Direct short bursts into the vent slots. Avoid holding the can upside down. If the laptop is older than two to three years and has never been opened, consider having a technician repaste the CPU and GPU.
When charging, use the laptop on a hard, flat surface only. Soft surfaces like beds and couches block the bottom vents entirely. A laptop cooling pad helps during demanding workloads.
Charge the laptop while it is idle, with no applications running, and check whether the battery now reaches 100%.
Expected Result: With thermal load reduced, charging climbs to 100% without interruption.
If Failed: The laptop is not overheating, or cleaning the vents made no difference. The issue is not thermal. Consider Fix 9 if the battery report confirms low capacity.
Technician Tip: A laptop that throttles charging due to heat is also degrading the battery faster than normal. If this has been happening for months, run the battery report afterward to check how much capacity has already been lost.
Fix 8: Power Reset (Clear Stuck Charging State)
Cost: Free Time: 5 minutes Difficulty: Easy
Sometimes a software or firmware glitch locks the charging circuit into a state where it refuses to continue past a certain point. A full power drain clears this.
Shut down the laptop. Unplug the charger. If your laptop has a removable battery, remove it. Press and hold the power button for 30 seconds to drain residual power from the capacitors. Reconnect the battery (if removed). Plug in the charger. Power on.
Expected Result: Normal charging behavior resumes. This is a longshot but takes only five minutes and has no downside.
If Failed: The stuck charging state was not the cause. Move to Fix 9 or the Repair Shop section.
Fix 9: Battery Replacement
Cost: $40-$120 (battery) + $0-$80 (labor if professional) Time: 30-90 minutes Difficulty: Medium-Hard
When the battery report confirms Full Charge Capacity below 60-70% of Design Capacity, and no software fix improved the situation, replacement is the correct outcome.
Order a replacement battery for your exact laptop model. Use OEM batteries when possible. If OEM is unavailable or too expensive, choose a reputable third-party brand that lists your exact model number as compatible. Avoid cheap no-name batteries without capacity or cycle specifications listed.
Many modern laptops have non-removable batteries that require removing the back panel. Use a plastic spudger to avoid damaging the chassis. Disconnect the battery connector carefully. Some models use adhesive to hold the battery pack in place. Replacement guides specific to your model are available on YouTube and iFixit for most common laptops.
Expected Result: The new battery charges to 100% and holds charge as expected for a fresh battery.
If Failed: If a new battery also fails to charge to 100%, the fault is in the charging circuit on the motherboard, not the battery. This requires board-level diagnosis.
Technician Tip: After installing a new battery, run one calibration cycle (Fix 4 above) to set the fuel gauge baseline correctly from the start. This prevents calibration drift developing early.
Mistakes That Make the Problem Worse
Immediately assuming the battery is dead. The most common cause is a software charge limit that takes thirty seconds to disable. Before buying anything, check the manufacturer app.
Draining the battery to zero repeatedly to “fix” it. Deep discharge cycles damage lithium-ion chemistry. Modern Li-ion batteries have no “memory effect” that requires full discharge. Deep cycling as a calibration strategy accelerates degradation. Only do the calibration cycle once if the percentage reporting seems wrong, not as regular maintenance.
Updating BIOS without keeping the charger plugged in. A BIOS update that gets interrupted by power loss can brick your laptop. Always have the charger connected throughout the entire process.
Installing a third-party battery without verifying the model match. Batteries listed as “compatible” with a wide range of models are often lower capacity than the original. Always match the part number or verify capacity specifications match your original battery.
Uninstalling the ACPI driver and then immediately restarting without scanning for hardware. The driver needs Windows to rediscover it via Scan for Hardware Changes before restarting. Restarting without that step can leave Windows in a confused state.
Buying a used or refurbished charger. A charger that is already degraded will deliver inconsistent wattage. New and OEM is always the safer option for charging hardware.
Ignoring a swollen battery. If the laptop chassis is bulging, the trackpad is lifting, or the screen hinge is separating, the battery is swollen. This is a fire risk. Do not try to charge it, compress it, or puncture it. Seek professional disposal immediately.
Brand-Specific Considerations
Dell
Dell’s BIOS battery modes vary significantly by product line. Consumer Inspiron models may not have a Battery Health Manager in BIOS at all, while Latitude, XPS, and Precision models often do. The Dell Power Manager app was discontinued on some newer models and replaced with Dell Optimizer, which does not offer the same granular charging control. If you cannot find battery charge settings in your Dell’s software, check the BIOS directly (F2 on boot > Power Management). For Inspiron 3525 specifically, updating to BIOS 1.23.0 or later resolved a charging limitation bug.
HP
HP restricts battery charge limiting to business-class laptops (EliteBook, ProBook). Consumer Pavilion, Envy, and Spectre models often do not have an accessible charging threshold setting in Windows at all. The Battery Health Manager option in BIOS (F10 on boot) is the only avenue on HP consumer models. If the BIOS on your HP model does not show a battery setting even after a BIOS update, your model simply does not support software charge limiting. Check HP’s official diagnostics (HP PC Hardware Diagnostics UEFI) if you suspect a hardware fault.
Lenovo
Lenovo ThinkPad and IdeaPad models are the most common source of “conservation mode confusion.” Conservation Mode in Lenovo Vantage caps charging at approximately 60% on many ThinkPad models, not 80%. ThinkPads also allow custom battery thresholds directly in BIOS. Legion gaming laptops use a different interface inside Lenovo Vantage where the battery option may be labeled differently. If Vantage is not installed, download it from the Microsoft Store.
ASUS
ASUS uses two levels in Battery Health Charging: Balanced Mode (caps at 80%) and Maximum Lifespan Mode (caps at 60%). Newer ASUS models from 2022 onward may only show a simple on/off toggle in MyASUS, defaulting to 80% when enabled. ASUS also offers Instant Full-Charge Mode for a temporary one-time override without permanently disabling the protection. If MyASUS is not installed, download it from the Microsoft Store or the ASUS support page.
MSI
MSI Dragon Center (now MSI Center) has a Battery Calibration tool available in the Battery Health Options section. MSI recommends running calibration every three months. The Balanced mode caps at 80%, while Best for Battery caps at 60%. Gaming MSI laptops tend to generate more heat during charging, making thermal throttling a more frequent cause of charging interruptions than on standard models.
Acer
Acer Care Center provides a simple Battery Charge Limit toggle. Acer’s BIOS does not typically include separate battery charge threshold options, so the app is the primary tool. Acer gaming laptops (Nitro, Predator) may have additional power management controls inside their dedicated gaming hub software.
Repair Shop Diagnosis

When a laptop comes in with a battery that will not charge to 100%, the first five minutes are spent ruling out software before touching any hardware.
The technician opens the battery report, checks for any active manufacturer charge limit, and looks at the Full Charge Capacity vs Design Capacity ratio. If the capacity is healthy, a driver reinstall or BIOS check is usually all that is needed. If the capacity has dropped significantly, the conversation shifts to replacement.
For hardware-level diagnosis, technicians use a multimeter to verify the charger is delivering the correct voltage at the connector. They also use dedicated battery diagnostic software or the manufacturer’s official hardware diagnostic tool (Dell’s F12 diagnostics, HP’s UEFI diagnostics) to pull battery health data from the controller firmware, which is more reliable than Windows ACPI reporting in some edge cases.
Typical repair costs: ACPI driver fix (free, done in minutes), BIOS update (free to $30 if done at a shop), battery replacement ($60-$150 parts and labor depending on model), charging circuit board repair ($80-$200 if the motherboard charging section is at fault).
Professional repair makes sense when the battery is physically inaccessible without specialized tools, the laptop has an active warranty, or the user suspects board-level charging circuit damage.
When Hardware Replacement Is Necessary
Battery replacement is the right call when:
- Full Charge Capacity in the battery report is below 60-70% of Design Capacity
- The laptop shuts down suddenly at seemingly normal battery percentages
- The battery report shows wildly inconsistent Full Charge Capacity values (possible failing cell)
- No software fix has changed the charging behavior
- The battery is physically swollen (replacement is urgent, not optional)
Motherboard charging circuit replacement or repair is needed when:
- A brand new battery also fails to charge to 100%
- The laptop charges on one charger but not another of the same wattage
- The manufacturer’s hardware diagnostic returns a charging circuit fault code
Stop Troubleshooting and Seek Professional Repair If
The battery is visibly swollen.
A bulging battery is a fire hazard. The trackpad lifting, the chassis bowing, or gaps appearing in the keyboard area are all warning signs. Stop using the laptop on battery immediately and take it to a professional for safe removal and disposal.
You smell burning or notice heat from inside the case.
Disconnect the charger immediately. An overheating charging circuit can cause permanent board damage or pose a fire risk.
The laptop shows “No Battery Detected” after previously charging normally.
This indicates the battery controller or connector has failed, or the battery has completely died. Software fixes will not help.
You have already replaced the battery and the new one also will not charge to 100%.
The fault is in the motherboard charging circuit, not the battery. A technician with board-level repair experience is needed.
The laptop loses charge even while plugged in.
This means power draw exceeds what the charger delivers. Check that the charger wattage matches the laptop’s requirement, and if it does, have the charging circuit evaluated.
Prevention Tips

Keep battery charge between 20% and 80% for day-to-day use when runtime is not a priority. Lithium-ion cells degrade fastest when held at full charge for extended periods. Conservation mode is your friend if you work mostly at a desk.
Use a hard, flat surface at all times. Blocking the bottom vents forces the thermal throttle to cut charging input. A laptop stand costs under ten dollars and meaningfully reduces sustained temperatures.
Use only the OEM charger or a certified replacement at the correct wattage. Underpowered chargers and non-PD USB-C chargers create erratic charging behavior and stress the battery controller.
Run the battery report (powercfg /batteryreport) every three to four months. Tracking Full Charge Capacity over time lets you plan a battery replacement before performance degrades noticeably.
Never leave the laptop storing at 0%. If you are storing the laptop for a month or longer, charge to 50-60% first. A battery left at near-zero for months can lose the ability to accept a charge at all.
Avoid charging the laptop in very hot environments or in direct sunlight. Heat is the single biggest accelerant of lithium-ion battery aging.
Keep Windows and BIOS updated. Manufacturers regularly push firmware fixes that improve charging behavior, accuracy, and battery controller communication.
Frequently Asked Questions

Why does my laptop battery stop charging at exactly 80%?
This almost always means Battery Conservation Mode or Battery Care Mode is active in your manufacturer’s app (Lenovo Vantage, MyASUS, Dell Power Manager) or BIOS. Open the relevant app and look for a battery charge limit toggle. Disabling it allows the battery to charge to 100% again.
Is it bad that my laptop stops charging at 80%?
Not at all. Limiting charge to 80% is actually better for the battery’s long-term lifespan. Lithium-ion cells degrade faster when held at 100% charge for long periods. If you work mostly at a desk with the laptop plugged in, leaving conservation mode on will make the battery last longer overall. Only disable it before a day away from a charger.
My battery shows 100% but my laptop dies in less than an hour. Is this the same problem?
No. That is a battery capacity problem, not a charging cap. Your battery’s physical capacity has degraded significantly, so what Windows reports as “100%” is actually much less energy than the battery originally held. Run powercfg /batteryreport and compare Full Charge Capacity to Design Capacity.
Will calibrating my battery make it hold more charge?
Calibration corrects the accuracy of the battery meter, it does not restore lost physical capacity. If your battery genuinely cannot hold as much energy as it used to, calibration will not change that. It only helps when the percentage shown by Windows is inaccurate relative to the actual charge level.
My battery was charging to 100% fine until a Windows update. What changed?
Windows updates occasionally conflict with the ACPI battery driver or inadvertently enable battery management settings. Try uninstalling the Microsoft ACPI-Compliant Control Method Battery driver in Device Manager, scanning for hardware changes, and restarting. Also check whether your manufacturer’s app now shows a charge limit that was not there before.
The battery charges to 99% and stays there. Is something wrong?
Usually not. Many laptops taper the charging rate significantly as they approach 100% to reduce heat and stress on the cells. Sitting at 99% for 15-30 minutes before the final 1% is normal behavior. If it stays at 99% for hours without moving, check that the charger connection is solid and try the power reset from Fix 8.
Can I damage my laptop by never letting the battery charge to 100%?
No. Modern laptops are designed to run on AC power directly when a charge limit is active. The laptop switches to running off the charger while the battery sits at 80%, bypassing the battery entirely. The battery is not being damaged by sitting at 80%, and the laptop functions normally.
Conclusion
A laptop battery that will not charge to 100% is most often a software cap that takes thirty seconds to remove, not a hardware failure. Check your manufacturer’s battery management app first, then BIOS, then address drivers and charger quality before assuming the battery itself needs replacing. If the battery report shows a significant drop in Full Charge Capacity, replacement is the correct fix and the only one that will actually restore runtime. Use the LapSolve Battery Health Estimator to track your battery’s condition over time and catch degradation before it becomes a problem.