Quick Answer
The most common cause of high laptop CPU usage is a background process Windows Defender scanning, Windows Update downloading, or a stuck Service Host loop. Open Task Manager (Ctrl + Shift + Esc), sort by CPU, identify the top offender, and end or reschedule it. Most cases resolve within minutes without touching hardware.
Introduction
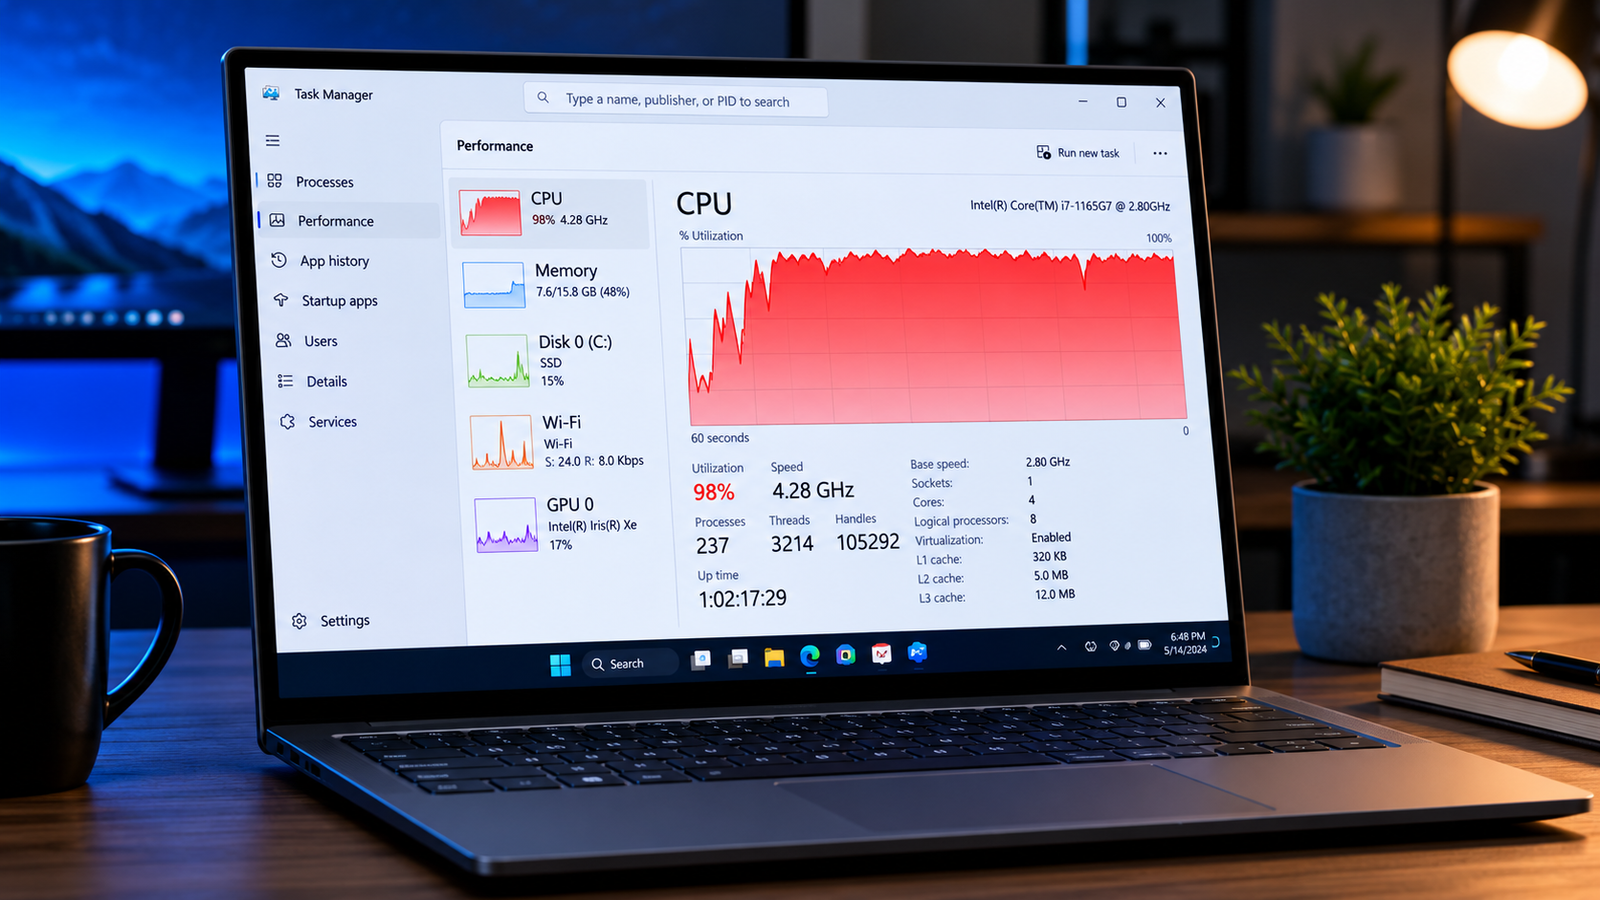
You open Task Manager and the CPU column is sitting at 80%, 90%, even 100% and you haven’t opened a single app. The fan is screaming, the laptop is warm to the touch, and everything feels like it’s wading through mud. This is one of the most common laptop complaints I see, and it almost always has a specific, fixable cause.
High CPU usage on a laptop means the processor is working close to its maximum capacity when it shouldn’t be. On a healthy system with no programs open, Windows should idle at 5–15%. Anything above 40% at idle is a problem worth diagnosing properly. This guide covers every real cause I’ve seen in the shop background service loops, thermal throttling, driver bugs, malware, and the handful of hardware situations where software fixes won’t cut it.
Work through the Fast Diagnosis section first. It saves you from running random fixes that don’t match your actual problem.
Symptoms of High CPU Usage on a Laptop

- CPU percentage sitting above 40% in Task Manager with no programs open
- Fan running constantly or at high speed during light tasks
- Laptop chassis warm or hot during basic web browsing or document editing
- System sluggish when opening apps, typing, or switching windows
- Video and audio stuttering during streaming or calls
- Battery draining unusually fast under light use
- Windows notification: “Your PC is running slow”
- Task Manager shows “System Idle Process” high but system still feels slow (common misconception see Causes)
- Specific process names appearing repeatedly at the top: MsMpEng.exe, svchost.exe, WmiPrvSE.exe, SearchIndexer.exe
Start Here: Fast Diagnosis
Work through this tree before trying any fixes. Three minutes here saves an hour of guessing.
Is the high CPU happening right after a fresh boot or Windows Update?
→ YES: Likely Windows Update, Defender scan, or background indexing. Wait 20 minutes.
If it resolves on its own → normal Windows maintenance cycle.
If it persists → jump to Fix 3 (Windows Update) and Fix 4 (Defender scheduling).
→ NO: Open Task Manager → Processes tab → click “CPU” column to sort highest first.
Is one process using 30%+ on its own?
→ YES: Note the process name.
MsMpEng.exe or Antimalware Service Executable → Fix 4
svchost.exe → expand it; identify the child service → Fix 5
SearchIndexer.exe or Windows Search → Fix 6
A browser (Chrome, Edge, Firefox) → Fix 7
Unknown process you don’t recognize → Fix 9 (malware scan)
→ NO: CPU is high but spread across many small processes.
Check temperatures first using HWMonitor.
Temps above 90°C at idle → Fix 1 (cooling/thermal throttling)
Temps normal but performance poor → Fix 2 (power plan) or Fix 10 (clean reinstall)
Tools Needed
Built-in Windows tools:
- Task Manager (Ctrl + Shift + Esc)
- Resource Monitor (search “resmon” in Start menu)
- Task Scheduler (search “taskschd.msc”)
- Services console (search “services.msc”)
- Local Group Policy Editor (gpedit.msc Windows Pro/Enterprise only)
- Performance Monitor (perfmon)
Free diagnostic software:
- HWMonitor CPU and GPU temperature monitoring
- HWiNFO64 detailed hardware sensor data including throttle flags
- Process Explorer (Microsoft Sysinternals) deeper process inspection than Task Manager
- Malwarebytes malware scan (free tier)
- ThrottleStop laptop-specific CPU throttle detection and management
Hardware tools (for advanced repairs):
- Compressed air canister fan and vent cleaning
- Isopropyl alcohol (90%+) and cotton swabs thermal paste removal
- Thermal paste (Noctua NT-H2 or Thermal Grizzly Kryonaut) reapplication
- Precision screwdriver set laptop disassembly
Troubleshooting Matrix
| Symptom | Likely Cause | Fast Fix |
|---|---|---|
| High CPU immediately after boot, resolves in 20–30 min | Windows Update or Defender scan | Wait it out; reschedule scan |
| MsMpEng.exe at top of Task Manager | Antimalware Service Executable scan | Reschedule scan + add exclusions |
| svchost.exe consuming 20–50% | Windows Update downloading or stuck service | Stop/restart wuauserv service |
| CPU high, temps above 90°C, fan loud | Thermal throttling dust or dried paste | Clean vents; replace thermal paste |
| CPU high with normal temps, laptop on battery | Wrong power plan CPU capped/throttling | Set to Balanced or High Performance |
| CPU high, browser open with many tabs | Browser process overload | Limit tabs; check extensions |
| High CPU on new laptop | Background indexing or initial update pipeline | Allow 24–48 hours; reboot twice |
| Unknown process, no internet activity | Malware or cryptominer | Run Malwarebytes full scan |
| CPU shows 100% but system feels fine | Measurement glitch or gaming process | Normal; reboot if concerned |
| High CPU after driver update | Driver conflict | Roll back driver via Device Manager |
What Causes High CPU Usage on a Laptop

Cause 1: Background Windows Services (Service Host / svchost.exe)
Svchost.exe is a container process that runs multiple Windows services simultaneously. When people see it at the top of Task Manager, they assume it’s a virus it’s not. The actual culprit is one of the services running inside it: Windows Update (wuauserv), Windows Management Instrumentation (WMI), or Superfetch/SysMain are the usual suspects. Expand the svchost entry in Task Manager to see exactly which child service is doing the damage.
How to confirm: In Task Manager, click the arrow next to svchost.exe to expand child processes. The offending service shows a name, not just “svchost.”
Cause 2: Antimalware Service Executable (MsMpEng.exe)
This is Windows Defender doing its job scanning files in real time and running scheduled full scans. The problem is that by default, Defender schedules full scans without considering whether the laptop is in use. A scan during your lunch meeting will peg the CPU for 15–45 minutes. Many users disable Defender entirely when they see this, which is the wrong move it just needs to be rescheduled.
What users misunderstand: Ending the MsMpEng.exe process in Task Manager only stops it temporarily. Windows restarts it automatically within seconds. The fix is in Task Scheduler, not Task Manager.
Confirmation sign: CPU drops completely when you manually pause the Windows Defender scan.
Cause 3: Thermal Throttling
This is the sneaky one. When a laptop overheats, the processor deliberately lowers its clock speed to reduce heat output. This is called thermal throttling. The CPU appears to be running at 80–100% usage because the chip is now working harder at a lower frequency to do the same work the workload didn’t change but the processing power dropped. Dust-clogged vents or dried thermal paste are the most common physical causes on laptops 2–3 years old or older.
What users misunderstand: They see high CPU usage and blame software, never checking temperatures. A CPU running at 40% of its normal frequency will show 100% usage doing tasks that should be easy.
Confirmation sign: Open HWiNFO64 and check for “Thermal Throttling” flags in the CPU section. Temperatures above 90°C at idle are a dead giveaway.
Cause 4: Malware and Cryptominers
Modern malware disguises itself as legitimate Windows service names. Cryptomining malware is particularly common it runs silently in the background, using your CPU to generate cryptocurrency for whoever planted it. Task Manager alone won’t always reveal it because the process names are spoofed. A full scan with Malwarebytes (not just Windows Defender, since the infection may have disabled it) is the right diagnostic tool here.
Confirmation sign: CPU stays high even when you boot into Safe Mode with Networking and let the system sit idle.
Cause 5: Driver Conflicts
An outdated or corrupted driver especially GPU drivers can cause certain Windows processes to loop and consume CPU. A broken Intel or AMD graphics driver will sometimes cause the Display Window Manager (dwm.exe) to spike. Driver issues often appear after a Windows Update, a graphics driver update, or after connecting a new external display.
Confirmation sign: The problem started within 24 hours of a system update or new hardware connection.
Cause 6: Power Plan Set Incorrectly
Windows power plans control how the CPU operates. “Power Saver” mode caps maximum processor state, which can paradoxically cause 100% CPU usage readings the processor is throttled, so it hits its ceiling faster. Running on battery with an aggressive power profile does the same thing. This is extremely common on laptops from users who have never touched their power settings.
Confirmation sign: CPU usage drops when you plug in the charger and switch to Balanced mode.
Cause 7: Browser Tab Overload
Chrome, Edge, and Firefox each spawn separate processes per tab and extension. A laptop with 15 open tabs, three extensions, and auto-playing video ads can easily see 30–60% CPU from the browser alone before any other apps are running.
Confirmation sign: Task Manager shows multiple browser child processes; closing tabs brings CPU down immediately.
What We See Most Often
In the shop, the split roughly goes like this. The majority of high CPU calls especially on laptops 1–4 years old come down to three things: Defender scan scheduling, Windows Update running in the background, or a browser with too many open tabs. These resolve quickly with software fixes.
The next most common scenario is thermal throttling on laptops that are 3+ years old, especially from brands like ASUS, HP Pavilion, and Lenovo IdeaPad where thin chassis designs accumulate dust in the heatsink fast. Users almost always blame Windows when the real problem is a CPU running 25°C hotter than it should.
The misdiagnosis we see most often is someone spending hours disabling Windows services, running system restores, and even reinstalling Windows when the actual problem was a Defender scan that would have finished on its own in 20 minutes. Diagnosis first, always.
How to Diagnose High CPU Usage Step by Step

Step 1: Check which process is responsible
Open Task Manager (Ctrl + Shift + Esc). Click the CPU column header to sort by highest usage. Note the top process.
Expected Result: One process stands out clearly above the rest. If unclear: Open Resource Monitor (search “resmon”) for a more granular view.
Step 2: Check CPU temperature
Download and run HWMonitor or HWiNFO64. Note the CPU Package temperature at idle.
Expected Result: Below 55°C idle, below 85°C under light load. If Failed (temps above 90°C idle): Thermal throttling is the primary cause. Skip to Fix 1.
Step 3: Check if the issue persists in Safe Mode
Hold Shift, click Restart → Troubleshoot → Advanced Options → Startup Settings → Enable Safe Mode. Let the system idle for 5 minutes. Open Task Manager.
Expected Result: CPU drops to 5–15% in Safe Mode. If CPU stays high in Safe Mode: Suggests hardware issue or deep OS corruption. Jump to the hardware section. If CPU normalizes in Safe Mode: The cause is a third-party program or service. Continue to Step 4.
Step 4: Run a clean boot
Press Win + R, type msconfig, go to the Services tab, check “Hide all Microsoft services,” then click “Disable all.” Restart.
Expected Result: CPU drops significantly. If Failed: The problem is a Windows-native service. Check Windows Update, Defender, and WMI specifically.
Step 5: Run a full malware scan
Boot normally. Download Malwarebytes (free tier). Run a full scan — not quick scan.
Expected Result: Clean results. If malware found: Quarantine everything Malwarebytes flags. Restart. Recheck CPU.
Which Fix Usually Works?
| Fix | Typical Success Likelihood | Cost | Difficulty |
|---|---|---|---|
| Reschedule Defender scan | Very Common | Free | Easy |
| Stop/restart Windows Update service | Very Common | Free | Easy |
| Switch power plan to Balanced | Common | Free | Easy |
| Close browser tabs, disable extensions | Common | Free | Easy |
| Disable startup programs | Common | Free | Easy |
| Roll back GPU driver | Common | Free | Moderate |
| Clean laptop vents with compressed air | Common | $5–10 | Easy |
| Replace thermal paste | Common | $10–20 | Moderate (requires disassembly) |
| Malware removal | Occasional | Free | Easy–Moderate |
| Windows clean reinstall | Occasional | Free | Moderate |
| RAM upgrade | Rare | $30–80 | Moderate |
Step-by-Step Fixes

Fix 1 Clean Laptop Vents and Check Fan
Cost: $5–10 (compressed air canister) Time: 15–30 minutes Difficulty: Easy
- Shut down the laptop completely. Unplug from power.
- Look at the sides and bottom for air vents. These are the dust entry and exhaust points.
- Hold the compressed air canister upright. Aim short 1–2 second bursts into each vent. Never hold the trigger continuously it can spray liquid propellant.
- Rotate the laptop and repeat for all vent locations.
- Power on and run HWMonitor. Check if temperatures dropped.
Expected Result: CPU temperatures drop 10–20°C. High CPU usage caused by throttling resolves. If Failed: Dust buildup may be internal on the heatsink fins. Requires disassembly. Move to thermal paste replacement or take to a repair shop. Technician Tip: Blow air in from the exhaust vents (the ones where heat comes out when running), not just the intake grilles. This pushes the compressed dust plug out the other side rather than deeper in.
Fix 2 Fix Windows Power Plan
Cost: Free Time: 5 minutes Difficulty: Easy
- Click Start, search “Edit Power Plan.”
- In the Power Options window, click “Show additional plans” if available.
- Select “Balanced” or “High Performance.” Avoid “Power Saver.”
- Click “Change plan settings” → “Change advanced power settings.”
- Expand “Processor power management.” Set “Minimum processor state” to 5% and “Maximum processor state” to 100%.
- Click Apply → OK. Restart.
Expected Result: CPU usage normalizes. Particularly effective when the problem appears only on battery. If Failed: Power plan wasn’t the root cause. Continue to next fix. Technician Tip: Dell and HP both ship laptops with a hidden OEM power plan that caps CPU at 50–60%. If you see a brand-specific option in Power Plans (like “Dell Recommended”), try switching to the standard Windows “Balanced” plan instead.
Fix 3 Stop Windows Update from Running Constantly
Cost: Free Time: 10 minutes Difficulty: Easy
- Open Task Manager → look for svchost.exe near the top.
- Expand it. If you see “Windows Update (wuauserv)” underneath, that’s your culprit.
- Press Win + R, type services.msc, press Enter.
- Find “Windows Update.” Right-click → Stop.
- Wait 60 seconds. Check if CPU drops.
- If yes, right-click Windows Update service again → Properties → change “Startup type” to “Manual” to prevent it from auto-resuming constantly.
Expected Result: Immediate CPU drop after stopping the service. If Failed: Windows Update wasn’t the cause. Restart the service and move on. Expert Warning: Don’t leave Windows Update permanently disabled. Switch it back to “Automatic” once you’ve confirmed updates are complete and the system is stable, or schedule it to run overnight.
Fix 4 Reschedule Windows Defender Scans
Cost: Free Time: 10 minutes Difficulty: Easy
- Press Win + R, type taskschd.msc, press Enter.
- Navigate to: Task Scheduler Library → Microsoft → Windows → Windows Defender.
- Double-click “Windows Defender Scheduled Scan.”
- Click the “Triggers” tab → Edit the existing trigger.
- Change the schedule to run at 2:00 AM daily, or whenever the laptop is not in use.
- Check “Stop the task if it runs longer than: 1 hour.”
- Click OK.
Optionally, cap the CPU usage Defender is allowed to consume:
- Open gpedit.msc (Windows Pro only) → Computer Configuration → Administrative Templates → Windows Components → Windows Defender Antivirus → Scan → “Specify the maximum percentage of CPU usage during a scan.” Set to 30–50%.
Expected Result: No more random CPU spikes from Defender during active use. If Failed: The spikes may be from real-time scanning of a specific folder. Add that folder to Defender’s exclusion list if it’s a safe location (like your downloads or project folder). Technician Tip: Adding MsMpEng.exe itself to the Defender exclusion list is a common forum recommendation — skip it. You’d be telling Windows Defender not to scan its own antivirus process, which is a security risk and rarely changes behavior.
Fix 5 Identify and Restart Stuck svchost Services
Cost: Free Time: 10–20 minutes Difficulty: Moderate
- Open Task Manager → Details tab → find svchost.exe instances.
- Right-click the high-CPU svchost → “Go to service(s).”
- This highlights which services are running inside it.
- Open services.msc. Find the highlighted service.
- Right-click → Restart.
Common svchost offenders and their fixes:
- wuauserv (Windows Update) → See Fix 3
- SysMain (Superfetch) → Right-click SysMain in services.msc → Stop. Set to “Disabled” if the laptop has an SSD (SysMain isn’t needed on SSDs).
- WmiPrvSE.exe (Windows Management Instrumentation) → Restart the WMI service. If it persists, run winmgmt /verifyrepository in an admin Command Prompt.
- DiagTrack (Connected User Experiences / Telemetry) → Stop and disable if you prefer it’s diagnostic data collection.
Expected Result: CPU drops after restarting the offending service. If Failed: The service restarts and immediately spikes again — suggests a deeper OS issue. Try Fix 10 (clean reinstall).
Fix 6 Disable or Rebuild Windows Search Indexing
Cost: Free Time: 10 minutes to disable; several hours to rebuild Difficulty: Easy
- Open services.msc.
- Find “Windows Search.” Right-click → Stop.
- Wait and watch Task Manager if SearchIndexer.exe was the culprit, CPU will drop.
- If confirmed: right-click Windows Search → Properties → set Startup Type to “Disabled.”
To rebuild the index instead (better long-term):
- Search for “Indexing Options” in Start menu.
- Click “Advanced” → “Rebuild.”
- The rebuild runs in the background and completes in 1–4 hours depending on drive size.
Expected Result: SearchIndexer.exe disappears from high CPU list. Technician Tip: Disabling Windows Search permanently breaks the Start menu search on some Windows builds. Rebuilding the index is a better choice than disabling entirely.
Fix 7 Fix Browser CPU Overload
Cost: Free Time: 5 minutes Difficulty: Easy
- In Task Manager, expand your browser. Look at per-tab and per-extension CPU usage.
- Close tabs you’re not actively using. Aim for fewer than 8–10 at a time.
- Disable browser extensions one by one to find a CPU-hungry one.
- In Chrome: go to chrome://settings/performance enable “Memory Saver” and “Energy Saver.”
- In Edge: edge://settings/system enable “Sleeping tabs” to freeze inactive tabs.
Expected Result: Browser’s share of CPU drops significantly. If Failed: The browser is fine; the issue is elsewhere in the system.
Fix 8 Update or Roll Back GPU Drivers
Cost: Free Time: 20–40 minutes Difficulty: Moderate
To update:
- Open Device Manager (right-click Start → Device Manager).
- Expand “Display adapters.”
- Right-click your GPU → “Update driver” → “Search automatically.”
- Alternatively, download directly from NVIDIA, AMD, or Intel’s website for the most current version.
To roll back:
- Device Manager → Display adapters → right-click GPU → Properties.
- Click “Driver” tab → “Roll Back Driver.”
- Restart and check CPU.
Expected Result: dwm.exe and GPU-related spikes resolve. If Failed: Try a full DDU (Display Driver Uninstaller) clean removal. Boot into Safe Mode, run DDU, restart, then install the driver fresh from the manufacturer’s site. Expert Warning: Don’t install GPU drivers from Windows Update if you have an NVIDIA card the Windows-provided versions are often outdated and missing performance fixes. Always get them from nvidia.com directly.
Fix 9 Run a Full Malware Scan
Cost: Free Time: 30–90 minutes Difficulty: Easy
- Download Malwarebytes from malwarebytes.com. The free tier handles scanning and removal.
- Install and run a full scan not the quick scan.
- If threats are found, click “Quarantine.”
- Restart the laptop.
- After restart, recheck CPU in Task Manager.
If you suspect a deeply embedded rootkit or cryptominer:
- Boot from a Windows recovery drive or USB and run the scan from outside the OS environment.
- ESET’s SysRescue live USB tool works well for offline scanning.
Expected Result: If malware was present, CPU usage drops after removal and restart. If Failed: The infection may have modified core Windows files. A clean Windows reinstall is the surest resolution.
Fix 10 Replace Thermal Paste (Hardware Fix)
Cost: $10–20 for paste; $40–80 if done at a repair shop Time: 45–90 minutes Difficulty: Moderate requires disassembly
Thermal paste between the CPU die and heatsink degrades after 3–5 years. When it dries out, heat transfer drops, temperatures climb, and throttling kicks in.
- Find a disassembly guide specific to your laptop model on iFixit or YouTube.
- Remove the battery before opening the chassis.
- Locate the CPU heatsink. It’s the flat metal block with copper heat pipes attached.
- Unscrew the heatsink in an X pattern (not sequential) to remove evenly.
- Clean old paste from the CPU die and heatsink surface using 90%+ isopropyl alcohol and a cotton swab or lint-free cloth. Be thorough — old paste residue reduces the effectiveness of new paste.
- Apply a pea-sized dot of new thermal paste (Noctua NT-H2 or Thermal Grizzly Kryonaut) to the center of the CPU die only. Don’t spread it the heatsink pressure does that.
- Reseat the heatsink. Tighten screws in X pattern.
- Reassemble. Boot and monitor temperatures in HWMonitor.
Expected Result: CPU temperatures drop 15–30°C. Throttling stops. Performance returns to normal. If Failed: The laptop’s fan may also be failing check that it spins properly when running. Expert Warning: Use too much paste and it can spread onto adjacent components. A dot the size of a pea is the maximum. Thin laptops like the Dell XPS or HP Spectre have extremely tight tolerances if you’re not confident disassembling them, take it to a shop.
Fix 11 Windows Clean Reinstall (Software Nuclear Option)
Cost: Free Time: 2–4 hours Difficulty: Moderate
When high CPU usage persists across every other fix, the Windows installation itself has become corrupt or so cluttered with background services that a clean start is the only reliable solution.
- Back up all data this process erases everything.
- Go to Settings → System → Recovery → “Reset this PC.”
- Choose “Remove everything” → “Cloud download” (downloads a fresh Windows image).
- Follow the prompts.
After reinstall, avoid immediately reinstalling all old software. Add programs one at a time and monitor CPU between each install to identify if a specific application caused the original issue.
Expected Result: CPU returns to normal 5–15% idle behavior. If Failed: CPU stays high after a clean Windows install. This indicates a hardware problem — see the hardware section below.
Mistakes That Make the Problem Worse
1. Ending MsMpEng.exe in Task Manager repeatedly Windows restarts Defender immediately. Worse, if you’re clicking End Task repeatedly while a scan is running, you risk corrupting the Defender definition database, requiring a full reinstall of Windows Security.
2. Disabling Windows Defender permanently without a replacement This is the most common mistake after seeing MsMpEng.exe at the top of Task Manager. You’re now unprotected, and if the high CPU was actually caused by malware disguising itself as a legitimate process, you’ve just made your situation worse. Reschedule the scan don’t kill the security.
3. Installing CPU “optimizer” or “cleaner” software Programs like CCleaner (in aggressive mode) or random “RAM cleaners” often add their own background processes that contribute to CPU usage. One of the most frequent workshop scenarios is a laptop with three different cleanup utilities fighting each other for resources.
4. Setting Maximum Processor State to below 100% Some guides suggest capping the processor state at 80–90% to reduce heat. This is a blunt fix that permanently reduces performance. On a laptop already thermal throttling, it stacks with throttling to make performance dramatically worse. Fix the cooling instead.
5. Running multiple antivirus programs simultaneously Every antivirus with real-time protection enabled wants to scan files as they’re accessed. Two real-time scanners running together causes constant CPU conflicts. Keep only one active.
6. Ignoring the problem and letting thermal throttling continue Sustained CPU temperatures above 95°C cause long-term silicon degradation. Ignoring a throttling laptop for months shortens the processor’s lifespan and increases the risk of sudden motherboard failure.
7. Reinstalling Windows without first backing up drivers Some older laptops particularly Lenovo ThinkPads and Dell business models have hardware components that require specific OEM drivers not available on Windows Update. A clean reinstall without backing up drivers first can leave you with a WiFi adapter or audio chip that stops working.
Brand-Specific Considerations
Dell
Dell laptops, particularly XPS and Inspiron models, use a feature called Thermal Management in the Dell Power Manager application. The default setting is “Optimized” but some users find that switching to “Cool” or “Ultra Performance” mode makes a significant difference for sustained CPU performance. Dell also ships with a BIOS-level power delivery cap on some 15W thin laptops that can be adjusted in BIOS under “Advanced” → “Performance.”
HP
HP Pavilion and Spectre models frequently develop heat vent blockage issues faster than competitors due to their intake being on the bottom of the chassis. Using the laptop on a blanket or carpet completely blocks airflow. HP also uses Omen Gaming Hub and HP Command Center on gaming models check whether any OEM thermal management software is running aggressive power-saving modes in the background.
Lenovo
IdeaPad models are notorious for excessive background processes from Lenovo Vantage. Lenovo Vantage runs multiple background services that can consume 5–15% CPU on their own. Check services.msc for Lenovo-specific entries and disable non-essential ones. ThinkPad users can also access Lenovo’s ThinkPad power management BIOS settings to adjust power limits (TDP) directly.
ASUS
ASUS ROG and TUF gaming laptops include Armoury Crate, which runs background optimization and RGB lighting control processes. These can contribute to elevated CPU usage. The ASUS MyASUS app on consumer models has a similar issue. Both can be uninstalled without affecting laptop function if you don’t use the features. ASUS also supports undervolting on many Intel models via the BIOS this reduces heat output and reduces throttling without losing significant performance.
Acer
Acer’s Nitro and Predator gaming laptops have been reported to run CPU-intensive Acer Care Center and Acer Quick Access processes in the background. These can typically be disabled in Task Manager’s Startup tab. Acer also tends to use very thin thermal paste application from the factory thermal paste replacement on Acer gaming laptops often yields dramatic temperature improvements even on units less than two years old.
Repair Shop Diagnosis

When a laptop comes in for high CPU usage, here’s the actual workflow we run through:
First check is always Task Manager see if the culprit process is obvious. If it is, most cases resolve in under 30 minutes with the software fixes above.
If Task Manager doesn’t show a clear offender, we connect HWiNFO64 and run a 10-minute stress test. This reveals whether the CPU is throttling thermally. We also look at the throttle flags in HWiNFO there are multiple types (thermal, power limit, electrical design point), and knowing which flag is active tells us exactly what’s happening.
For suspected malware, we run Malwarebytes offline from a bootable USB not inside the potentially compromised OS.
For hardware-level thermal diagnosis, we disassemble the unit and inspect the heatsink fins under a flashlight. A paste-starved or dust-plugged heatsink is visually obvious once you’re inside.
Typical repair costs:
- Software fixes (remote or in-shop): $0–50
- Cleaning and compressed air service: $30–60
- Full thermal paste replacement: $60–120 depending on laptop complexity
- Fan replacement: $60–150 including parts
When to bring it to a shop: If you’ve completed all the software fixes and the problem persists, or if the laptop is 3+ years old with temperatures above 90°C at idle, a professional disassembly and thermal service is the right call.
When Hardware Replacement Is Necessary
Fan failure: If HWiNFO shows fan RPM at 0 or fluctuating randomly while the laptop is hot, the fan has failed. A failing fan cannot be fixed by software. Replacement costs $20–60 for parts plus labor.
Heatsink deformation: On very old laptops, the copper heatsink itself can warp, preventing full contact with the CPU die. New thermal paste won’t fix this the heatsink needs replacement or repressing by a shop.
SSD near failure: A dying SSD can cause Windows processes to hang while reading data, which shows up as high CPU in WaitProcess metrics. Run CrystalDiskInfo to check drive health. A yellow or red status means replacement.
RAM failure or insufficient RAM: A laptop with 4GB RAM running Windows 11 will constantly page to disk, which raises CPU usage indirectly. HWMonitor showing memory at 90%+ with nothing open suggests either a RAM failure or an upgrade is needed. 8GB is the practical minimum for Windows 11 in 2026.
Stop Troubleshooting and Seek Professional Repair If
Burning smell during operation This is an electrical fault. Shut down immediately. Do not restart.
Swollen battery A puffy battery causes internal pressure on the motherboard. Continuing to run the laptop risks a thermal event. Power down, don’t charge it, bring it to a shop.
Laptop shuts off suddenly under any load, not just gaming Repeated emergency shutdowns under moderate use (browsing, video calls) suggest the CPU is hitting thermal limits within seconds. The cooling system has failed badly enough that software fixes won’t help.
Liquid damage history If the laptop was ever exposed to liquid and now shows high CPU with no software explanation, corrosion on the motherboard may be causing partial component failure.
CPU or GPU usage shows 0% in Task Manager but laptop is still hot and sluggish This suggests a sensor or motherboard issue that requires professional diagnostic equipment.
Prevention Tips

Keep the chassis elevated during use. Flat surfaces especially soft ones like beds and couches block bottom vents completely. A $15 laptop stand or even a book underneath makes a measurable difference in temperatures.
Clean vents every 6–12 months. This doesn’t require disassembly. A 30-second blast with compressed air through the exhaust vents every six months prevents the kind of dust buildup that leads to thermal throttling.
Schedule Defender and Windows Update for off-hours. Setting both to run at 2–3 AM when you’re not using the laptop eliminates the most common source of unexpected CPU spikes.
Don’t leave dozens of browser tabs open. Every tab consumes memory and CPU. Browser tab managers like OneTab (Chrome extension) suspend inactive tabs and can free up substantial resources.
Monitor temperatures annually. Download HWMonitor once a year and run it for 10 minutes under normal use. If your CPU is regularly hitting 85°C doing everyday tasks, schedule a thermal paste service before it becomes a performance problem.
Keep Windows and drivers updated. Outdated drivers are a frequent source of CPU spikes that disappear completely after an update. Run Windows Update monthly and check manufacturer sites for GPU driver updates quarterly.
Avoid power saver mode permanently. Leaving a laptop in Power Saver mode while plugged in forces the CPU to work harder to compensate for its artificially capped speed. Use Balanced mode as your default.
Limit startup programs. Every app that auto-launches at boot adds to background CPU load. Task Manager → Startup tab → disable everything that doesn’t need to run immediately.
Frequently Asked Questions

Why is my CPU at 100% but nothing is running in Task Manager? Task Manager defaults to showing processes grouped by application. Expand the “Windows processes” or “Background processes” section that’s where the real culprits hide. svchost.exe, MsMpEng.exe, and SearchIndexer.exe don’t appear under “Apps” but can consume 50%+ of CPU.
My brand new laptop has high CPU usage. Is it defective? Almost certainly not. New laptops run Windows Update, Cortana indexing, and initial security scans in the background for the first 24–48 hours. Let the laptop complete its initial setup cycle with a couple of restarts before worrying. If high CPU continues past 48 hours, then start diagnosing.
Will upgrading RAM fix high CPU usage? Sometimes but not always. If your RAM is near 100% capacity while the CPU is also high, adding RAM reduces the pressure on Windows memory management, which indirectly reduces CPU usage. However, if RAM is sitting at 50–60% and CPU is still high, more RAM won’t help.
Why does high CPU usage happen on battery but not when plugged in? Windows applies different power profiles depending on power source. On battery, the processor may be capped at 50–60% of its maximum speed. If the same workload that normally uses 30% CPU now requires 100% of a throttled processor, it registers as full CPU usage. Fix: Set battery power plan to “Balanced” instead of “Power Saver.”
Is it safe to run a laptop at 90–100% CPU for long periods? Short bursts are fine encoding video, running a scan, compiling code. Sustained 90–100% CPU at high temperatures (above 90°C) for hours at a time accelerates wear. If the laptop is constantly maxed out doing tasks that should be easy, that’s the signal something is wrong.
How long does a Windows Defender scan take? A quick scan runs 3–15 minutes. A full scan can take 30 minutes to 2 hours depending on how much data is on the drive. Both will push CPU noticeably. This is normal. Rescheduling eliminates the disruption.
Conclusion
High laptop CPU usage almost always has a specific, identifiable cause and most of the time, it’s a background Windows service doing something legitimate at the wrong moment. Start with Task Manager, identify the process, and match it to the fix above. If the problem turns out to be thermal throttling, cleaning the vents or replacing thermal paste resolves it in under an hour. Hardware replacement only becomes necessary in a small fraction of cases usually a failed fan or heavily degraded cooling system on an older machine.