Quick Answer
Most SSDs that will not show up are caused by a loose connection, a missing drive letter, or the wrong BIOS storage setting, not a dead drive. Check Disk Management first to see whether Windows even detects the drive. If it appears there as unallocated, you can usually fix it in minutes without losing any data.
Introduction
You installed a new SSD, or your existing one just vanished, and now your laptop will not show it anywhere. Not in File Explorer, and maybe not even in Disk Management. This is one of the most common repair calls we get, and in most cases the drive is not actually broken.
The real cause almost always sits at one of three levels: the physical connection, the BIOS storage configuration, or the Windows disk setup. Each level needs a different fix, and using the wrong one wastes time without solving anything.
This guide walks through the exact diagnostic order a technician uses, starting with the fastest checks and ending with hardware replacement. By the end you will know exactly which layer is failing and what to do about it.
Symptoms of the Problem

- SSD does not appear in File Explorer or “This PC”
- SSD missing from Disk Management entirely
- SSD shows in Disk Management but listed as Unallocated or Not Initialized
- SSD visible in Device Manager but not in Disk Management
- SSD not listed anywhere in the BIOS or UEFI storage menu
- Laptop boots fine but a second drive that used to be there is gone
- Drive was working yesterday and disappeared after a restart or Windows update
- Error message reading “You need to format the disk before you can use it”
- Drive letter conflict or duplicate drive letter warning
- SSD appears briefly during boot logging but vanishes once Windows loads
Start Here: Fast Diagnosis
Work through this in order. It tells you exactly which section below to jump to.
If the SSD is brand new and just installed → Check BIOS first, not Windows.
If the SSD shows up in BIOS → The hardware connection is fine. Skip ahead to the Windows-level fixes.
If the SSD does not show up in BIOS → Stop. This is a connection, slot, or compatibility problem, not a software fix.
If the SSD used to work and recently disappeared → Check Disk Management before touching BIOS at all.
If Disk Management shows the drive as Unallocated or Not Initialized → This is a quick software fix, not a failure.
If Disk Management shows nothing, but Device Manager shows the drive → This points to a Storage Pool conflict or a driver fault, not dead hardware.
If neither BIOS nor Windows shows the drive, and another laptop gives the same result → The SSD itself has likely failed.
Tools Needed
- Disk Management (built into Windows)
- Device Manager (built into Windows)
- BIOS or UEFI setup screen (built into the laptop firmware)
- Small Phillips screwdriver for laptops with a service panel
- Plastic spudger or prying tool for sealed-bottom laptops
- Manufacturer diagnostics (Dell SupportAssist, HP Hardware Diagnostics, Lenovo Diagnostics, or ASUS/Acer/MSI equivalents)
- A USB to M.2 or USB to SATA enclosure for testing the drive externally
- A can of compressed air for dust in the M.2 slot
Troubleshooting Matrix
| Symptom | Likely Cause | Fast Fix |
| Not in BIOS and not in Windows | Loose connection or wrong M.2 key type | Reseat the drive and confirm slot type |
| In BIOS, not in Disk Management | Storage driver fault or Storage Pool conflict | Update the storage driver, check Storage Spaces |
| In Disk Management as Unallocated | Drive not initialized | Initialize the disk and create a volume |
| In Disk Management but not File Explorer | Missing drive letter | Assign a drive letter |
| In Device Manager, not Disk Management | Storage controller driver fault | Reinstall the storage controller driver |
| Worked yesterday, gone today | Fast Startup glitch or reset BIOS setting | Disable Fast Startup, recheck BIOS |
| Visible everywhere but unreadable | Corrupted file system | Back up if possible, then reformat |
| Not visible anywhere, even externally | Dead SSD | Replace the drive |
What Causes SSD Not Showing in Laptop

Loose or Improper Connection
This happens most often right after installation, when a SATA cable is not fully seated or an M.2 drive is not pressed flat before the screw goes in. You can identify it because the drive shows up nowhere, not even in BIOS. Many people assume a brand new drive cannot have a connection problem, but a fresh install is exactly when this is most likely. The confirmation sign is a drive that reappears the moment it is reseated correctly.
Wrong M.2 Key Type or Protocol Mismatch
Laptop M.2 slots come in different flavors, and a SATA-only slot will never detect an NVMe-only drive no matter how well it is seated. You can identify it by checking your laptop’s exact model specs against the SSD’s listed interface type. The common misunderstanding is assuming all M.2 slots are universal, when many budget and mid-range laptops support only one protocol. The confirmation sign is a drive that is physically seated correctly but still invisible in BIOS.
Drive Not Initialized
Every brand new SSD ships blank, with no partition table, so Windows cannot assign it a letter or show it in File Explorer until it is initialized. You can identify it by opening Disk Management and seeing the drive listed but marked “Not Initialized” or “Unallocated.” Many users panic and assume this means the drive is faulty, when it is actually expected behavior for new hardware. The confirmation sign is that BIOS sees the drive normally, only Windows shows it as unconfigured.
Missing or Conflicting Drive Letter
Windows uses drive letters to make a disk visible in File Explorer, and a drive without one will not appear there even if Windows fully recognizes it. You can identify it because the drive shows correctly in Disk Management but is absent from “This PC.” This is often misunderstood as a hardware fault because the drive seems to disappear, when it is actually just unlabeled. The confirmation sign is a healthy looking partition in Disk Management with no letter assigned.
Outdated or Corrupted Storage Controller Driver
The storage controller driver is what lets Windows talk to the SSD at all, and a corrupted or missing one can hide an otherwise healthy drive. You can identify it by checking Device Manager for a yellow warning icon under Storage Controllers or Disk Drives. People often update the wrong driver, such as the chipset driver, while ignoring the specific storage controller entry. The confirmation sign is the drive reappearing immediately after a driver reinstall.
BIOS Storage Mode Set Incorrectly
Laptops can run their storage controller in AHCI, RAID, or Intel RST mode, and switching modes without matching the OS configuration can make a perfectly good drive vanish. You can identify it by checking the Storage or SATA Configuration menu in BIOS. This is frequently misdiagnosed as a dead drive because the symptom looks identical from the outside. The confirmation sign is the drive reappearing the moment the mode is switched back to match how Windows was installed.
Storage Pool or Storage Spaces Conflict
Windows Storage Spaces can silently take ownership of a new or used drive, especially on Dell systems where a pool was set up previously. You can identify it by checking Settings, then System, then Storage, then Manage Storage Spaces. Most users have no idea this feature exists, so they never think to look there. The confirmation sign is the drive listed inside a storage pool instead of as a standalone disk.
Failed or Dying SSD
SSDs do fail, usually from a damaged controller chip or worn out NAND flash after years of heavy use. You can identify true failure by testing the drive in a second laptop or external enclosure with the same result of nothing detected anywhere. The common misunderstanding is assuming a drive is dead before ruling out connection, BIOS, and Windows causes first. The confirmation sign is total invisibility across every system and every method you try.
What We See Most Often
In the shop, the overwhelming majority of “SSD not showing” calls turn out to be a connection issue on new installs or a missing drive letter on drives that were just reformatted or migrated. True dead SSDs are a smaller share of what comes through the door than people expect.
The most common misdiagnosis we see is a customer who already bought a replacement SSD before checking Disk Management, only to find out the original drive was fine and simply needed a drive letter. The second most common misdiagnosis is blaming the SSD for a problem that was actually a BIOS storage mode mismatch after a firmware update changed the default setting.
How to Diagnose the Problem

Step 1. Check BIOS or UEFI storage detection. Expected Result: the drive’s model name appears under Storage Configuration or the boot device list. If Failed: Next Action: skip Windows entirely for now and go straight to the physical connection and slot type checks below.
Step 2. Open Disk Management. Expected Result: the drive appears, even if it shows as Unallocated. If Failed: Next Action: move to Device Manager to see if Windows detects the hardware at a lower level.
Step 3. Check Device Manager under Disk Drives and Storage Controllers. Expected Result: the drive is listed with no warning icon. If Failed: Next Action: reinstall or update the storage controller driver.
Step 4. Check Manage Storage Spaces. Expected Result: no unexpected pool contains your drive. If Failed (drive is inside a pool you did not intend to create): Next Action: remove the drive from the pool before doing anything else.
Step 5. Test the drive in another laptop or a USB enclosure. Expected Result: the drive is recognized on the second system. If Failed: Next Action: treat the SSD as likely dead and move to replacement.
Step 6. Run manufacturer hardware diagnostics. Expected Result: the storage diagnostic passes with no errors. If Failed: Next Action: this confirms hardware failure and supports a warranty claim or professional repair.
Which Fix Usually Works?
| Fix | Typical Success Likelihood | Cost | Difficulty |
| Reseat the connection | Very Common | Free | Easy |
| Assign a drive letter | Common | Free | Easy |
| Initialize the disk | Common | Free | Easy |
| Update the storage driver | Common | Free | Easy |
| Change BIOS storage mode | Occasional | Free | Moderate |
| Remove drive from Storage Pool | Occasional | Free | Moderate |
| Enable the M.2 slot in BIOS | Occasional | Free | Easy |
| Reseat or swap the cable or drive | Common | Free | Moderate |
| Replace the SSD | Rare | $40 to $150 | Moderate |
Step-by-Step Fixes

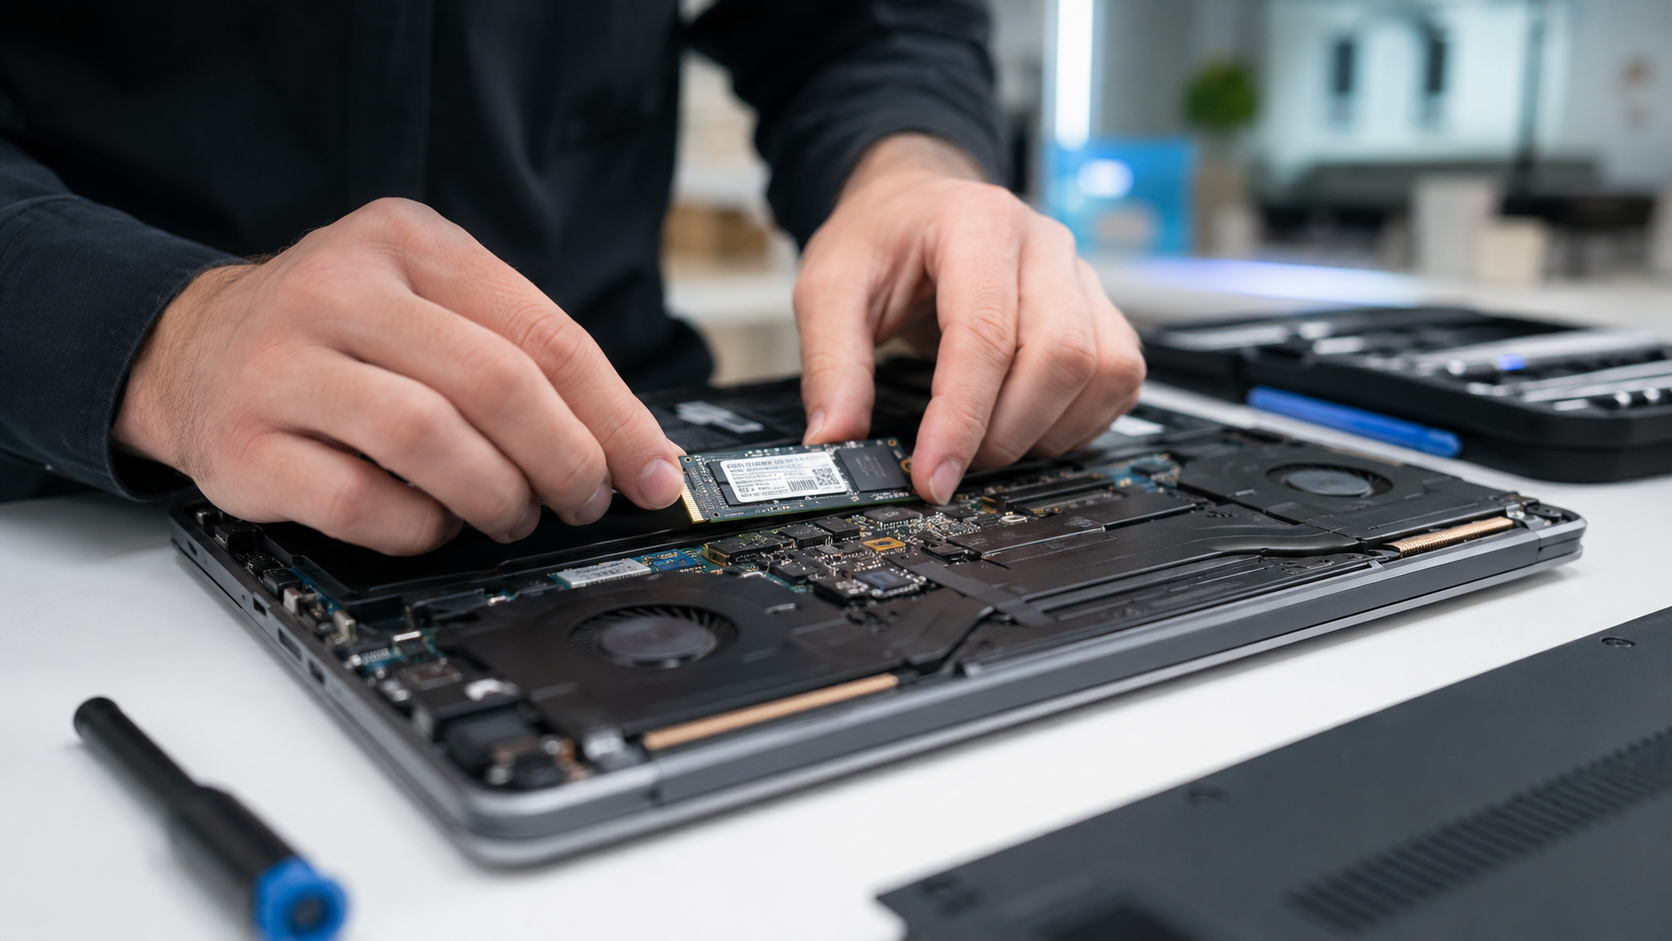
Reboot and Reseat the Connection
Cost: Free Time: 10 to 15 minutes Difficulty: Easy
Steps: Shut the laptop down completely and unplug it. Open the service panel or bottom cover. For SATA drives, unplug and firmly reseat both the data cable and the power connector. For M.2 drives, remove the retaining screw, lift the drive at a slight angle, and press it back down flat before rescrewing it.
Expected Result: the drive appears in BIOS on the next boot. If Failed: Next Action: move to checking the M.2 key type and slot compatibility.
Technician Tip: Press down gently on the far end of an M.2 drive before screwing it in. A drive that looks seated can still be tilted just enough to break the connection.
Assign a Drive Letter
Cost: Free Time: 2 minutes Difficulty: Easy
Steps: Right-click the Start button and open Disk Management. Find the SSD partition that shows no letter in the list. Right-click it, choose “Change Drive Letter and Paths,” then click “Add” and pick any unused letter.
Expected Result: the drive immediately appears in File Explorer. If Failed: Next Action: check whether the partition shows as Unallocated instead, which means it needs initializing rather than a letter.
Technician Tip: If the drive already has a letter that conflicts with a mapped network drive, changing it to an unused letter solves the conflict instantly.
Initialize the Disk
Cost: Free Time: 3 minutes Difficulty: Easy
Steps: Open Disk Management and look for the drive marked “Not Initialized.” Right-click it and select “Initialize Disk.” Choose GPT for a modern laptop running Windows 10 or 11, then right-click the unallocated space and select “New Simple Volume” to finish setup.
Expected Result: the drive becomes a usable partition with a letter and full capacity. If Failed: Next Action: the drive may not actually be detected at the hardware level, so recheck Device Manager.
Expert Warning: Initializing a disk that already contains data you want to keep will erase it. Confirm the drive is actually blank before continuing, especially if it came from another machine.
Update or Reinstall the Storage Controller Driver
Cost: Free Time: 10 minutes Difficulty: Easy to Moderate
Steps: Open Device Manager and expand “Storage Controllers.” Right-click the controller entry, choose “Uninstall device,” then restart the laptop so Windows reinstalls it automatically. If the drive still does not appear, download the manufacturer’s storage driver directly from the laptop brand’s support page instead of relying on Windows Update.
Expected Result: the SSD reappears in Disk Management after the restart. If Failed: Next Action: check whether the drive is part of a Storage Pool that is hiding it.
Technician Tip: Intel laptops often need the Intel Rapid Storage Technology driver specifically, not just a generic chipset driver, for newer NVMe drives to be recognized properly.
Remove the Drive from a Storage Pool
Cost: Free Time: 15 minutes Difficulty: Moderate
Steps: Go to Settings, then System, then Storage, then “Manage Storage Spaces.” If your SSD is listed inside a pool, select the pool, choose to remove the drive, and wait for Windows to migrate any data off it first. Once removed, the drive should appear as a standalone disk in Disk Management.
Expected Result: the SSD shows up as its own disk, separate from any pool. If Failed: Next Action: back up any critical data through the pool interface before deleting the pool entirely, since deleting it can be necessary in stubborn cases.
Expert Warning: Do not delete a Storage Pool without confirming there is enough free space elsewhere to hold the data first. Deleting a pool with nowhere for the data to go will destroy it.
Change the BIOS Storage Controller Mode
Cost: Free Time: 10 minutes Difficulty: Moderate
Steps: Restart the laptop and enter BIOS using the manufacturer’s key, commonly F2, F10, or Delete. Locate the Storage, SATA Configuration, or RST section and check the current mode (AHCI, RAID, or Intel RST). If a recent change switched this mode, set it back to match how Windows was originally installed.
Expected Result: the drive reappears in the BIOS storage list immediately after the change. If Failed: Next Action: check for a separate VMD Controller toggle, which some Intel-based laptops require to be enabled for NVMe detection.
Expert Warning: Switching storage mode on a drive that already has Windows installed can make that installation unbootable. Only do this on a secondary data drive unless you are prepared to reinstall the operating system.
Enable the M.2 Slot in BIOS
Cost: Free Time: 5 minutes Difficulty: Easy
Steps: Enter BIOS and look for a section covering onboard devices or M.2 configuration. Some laptops ship with a secondary M.2 slot disabled by default to save power. Enable the slot, save changes, and exit.
Expected Result: the previously invisible drive now appears in the storage list. If Failed: Next Action: confirm the SSD’s protocol type actually matches what that specific slot supports.
Technician Tip: Gaming laptops with two M.2 slots frequently ship with the second slot disabled out of the box. Check this before assuming a new upgrade drive is faulty.
Reseat or Swap the SSD and Cable
Cost: Free if you already have basic tools Time: 20 to 30 minutes Difficulty: Moderate
Steps: With the laptop off and unplugged, remove the SSD entirely. Inspect the connector and the M.2 slot or SATA port for bent pins, dust, or debris, and clean gently with compressed air if needed. Reinsert the drive, or test a different SATA cable if one is available, then power on and check BIOS again.
Expected Result: the drive is detected in BIOS after reseating or swapping the cable. If Failed: Next Action: test the SSD in another laptop or external enclosure to isolate the laptop from the drive itself.
Technician Tip: A SATA cable that looks fine can still have a hairline break inside the connector. Swapping the cable costs nothing and rules this out quickly.
Replace the SSD
Cost: $40 to $150 depending on capacity and interface type Time: 30 to 45 minutes plus time to reinstall the operating system or migrate data Difficulty: Moderate to Hard
Steps: Once the drive has failed to appear on a second system and failed manufacturer diagnostics, order a replacement matching the exact interface type your laptop supports (SATA M.2, NVMe M.2, or 2.5 inch SATA). Install the new drive using the same seating process described above, then reinstall Windows or restore from backup.
Expected Result: the new SSD is detected immediately in BIOS and Windows. If Failed: Next Action: if a brand new replacement also fails to appear, the problem was never the drive and likely sits in the motherboard’s storage controller itself, which calls for professional repair.
Expert Warning: Always confirm the exact interface type before buying. An NVMe-only laptop slot will never recognize a SATA M.2 drive, and the return process for a wrong-type SSD can be a hassle.
Mistakes That Make the Problem Worse
- Buying a replacement SSD before checking Disk Management. Most missing drives are a configuration issue, and a brand new drive will not fix a missing drive letter or wrong BIOS mode.
- Running CHKDSK repeatedly on a drive that is not initialized. CHKDSK only works on drives that already have a file system, so it does nothing for a blank new SSD and wastes time.
- Updating BIOS firmware as the first troubleshooting step. A BIOS update is a risky move that can introduce new problems, and it should be a later step, not an opening move.
- Force-removing a drive from a Storage Pool without backing up first. Skipping the migration step can permanently destroy any data that was stored in that pool.
- Assuming the drive is dead because Device Manager looks empty. A driver issue can hide a perfectly healthy drive from Device Manager, so this should be ruled out before writing the drive off.
- Switching BIOS storage mode on a drive that already has Windows installed on it. This can make the existing Windows installation unbootable, turning a minor annoyance into a full reinstall.
Brand-Specific Considerations
Dell Dell laptops with Storage Spaces configured at the factory are the most likely to silently absorb a new drive into a pool. Dell’s BIOS labels its storage mode toggle under “SATA Operation” rather than a generic “Storage” menu, so look there specifically.
HP HP’s support forums show frequent reports of M.2 slots that only support SATA-type SSDs despite specs implying broader support. Always confirm the exact sub-model number against HP’s own spec sheet before buying an NVMe drive.
Lenovo ThinkPad and IdeaPad models often require the Intel Rapid Storage Technology driver downloaded directly from Lenovo’s support site, since the generic Windows driver frequently fails to detect newer NVMe drives correctly. BIOS access is reliably Enter then F1 on most ThinkPad models.
ASUS Many ASUS gaming laptops ship with a second M.2 slot disabled by default in BIOS to manage power draw. Check the “Advanced” or “Onboard Devices” BIOS section before assuming a second drive upgrade has failed.
Acer Acer’s BIOS storage menu is sometimes labeled simply “Main” rather than “Storage” or “SATA,” which trips up users following generic guides written for other brands. F2 is the standard BIOS key across most current Acer laptop lines.
MSI MSI gaming laptops frequently use a VMD Controller toggle for NVMe RAID configurations, and leaving it enabled when only running a single drive can cause that drive to vanish from standard detection. Disabling VMD when not using RAID resolves this in most cases.
Repair Shop Diagnosis

A technician’s first move is almost always BIOS detection, since it instantly separates a hardware-level problem from a Windows-level one. From there, the standard workflow is Device Manager, then Disk Management, then a swap test in a second machine if nothing else explains the symptom.
Diagnostic tools used in shop settings typically include the manufacturer’s own hardware diagnostic suite plus a known-good external enclosure for isolation testing. A full diagnosis typically runs $30 to $60 if no parts are needed, while a drive replacement and data migration job typically runs $80 to $180 depending on capacity and whether Windows needs a clean reinstall.
Professional repair is justified once a drive fails to appear on a second system and fails manufacturer diagnostics, since that confirms either a dead drive or a motherboard-level storage controller fault that is well beyond a home fix.
When Hardware Replacement Is Necessary
Replace the SSD itself when it fails to appear on a second laptop or in an external enclosure and also fails the manufacturer’s hardware diagnostic. Replace the SATA cable, rather than the drive, if a known-good replacement cable restores detection on a SATA-connected laptop.
If a brand new, confirmed-compatible replacement SSD still fails to appear in the same slot, the motherboard’s storage controller itself is the likely point of failure, not the drive. That scenario requires a motherboard-level repair, which is a job for a professional shop rather than a home fix.
Stop Troubleshooting and Seek Professional Repair If
Stop immediately and get professional help if you notice a burning smell anywhere near the SSD slot or motherboard, since this points to an electrical short that can spread damage with continued use. The same applies to any visible motherboard damage, such as scorch marks, melted plastic, or corrosion around the connector.
A swollen battery anywhere in the chassis is also a stop sign, since opening the laptop further while a battery is swelling increases puncture risk. Liquid damage near the storage area calls for a full professional cleaning before any drive troubleshooting, since corrosion can spread invisibly under components.
Repeated unexpected shutdowns specifically while accessing the drive under heavy load can indicate a failing power delivery path to the SSD, not just the drive itself. Continuing to test in that state risks further damage to the motherboard.
Prevention Tips

- Confirm your exact laptop sub-model’s supported M.2 interface type before ordering any replacement or upgrade SSD.
- Back up critical files to a second physical drive or cloud storage on a regular schedule, not only when a drive starts acting up.
- Avoid letting Windows Update silently flip BIOS-adjacent power settings by checking Fast Startup status after major Windows updates.
- Keep one known-good SATA cable and one USB to M.2 enclosure on hand for quick isolation testing if a drive ever goes missing.
- Check Manage Storage Spaces after installing any used or cloned drive, even if everything appears to be working normally.
- Update storage controller drivers directly from your laptop manufacturer’s support page rather than relying solely on Windows Update.
- Avoid switching BIOS storage modes on a drive that already has an operating system installed unless you are prepared to reinstall it.
Frequently Asked Questions

Why does my new SSD show up in BIOS but not in Windows?
This almost always means the drive needs to be initialized or assigned a drive letter in Disk Management. It is expected behavior for a brand new, blank drive and does not indicate a fault.
Will I lose data if I initialize my SSD?
Initializing a genuinely blank new drive does not put any existing data at risk, since there is nothing on it yet. Initializing a drive that already contains data you want to keep will erase that data, so confirm the drive’s history first.
Can a loose SSD connection stop a laptop from booting at all?
Yes, if the SSD is your boot drive and it is not seated properly, the laptop can fail to find an operating system entirely. A non-boot secondary drive being loose will not stop the laptop from starting, only from showing that second drive.
Why did my SSD disappear after a Windows update?
Windows updates occasionally reset Fast Startup behavior or, in rarer cases, alter storage driver configurations during installation. Checking Device Manager and Disk Management right after the update usually reveals which of the two happened.
Is it safe to use any NVMe SSD in any laptop M.2 slot?
No, some laptop M.2 slots only support SATA-type SSDs despite looking identical to NVMe slots. Always confirm your exact model’s supported interface before purchasing a drive.
How do I know if my SSD is actually dead rather than misconfigured?
Test it in a second laptop or a USB enclosure. If it fails to appear there as well, and also fails a manufacturer hardware diagnostic, that confirms genuine drive failure rather than a configuration issue.
Conclusion
Most laptops with a missing SSD are dealing with a loose connection, a missing drive letter, or a BIOS storage setting, not a dead drive. Work through BIOS detection, then Disk Management, then Device Manager, in that order, before assuming the worst. Replacement is only necessary once the drive fails to appear on a second system and fails a hardware diagnostic. Everything short of that is fixable in under half an hour with tools you likely already have.